
Snowflake boasts powerful import capabilities from data files including CSV, JSON, and Parquet. What about a less frequently used file type – the fixed-width file? Yep! Snowflake can handle that with ease.
A fixed-width text file is a type of data file where each line contains records of a predetermined length, with fields aligned in columns of fixed widths. Unlike delimited files where fields are separated by a character like a comma or a tab, fixed-width files have specific character positions for each field. They are commonly used in “legacy systems” or applications that rely on strict formatting.
Loading data from a fixed-width file in Snowflake follows the same process as loading a CSV or other delimited text file. The primary differences are the options set in the file format object and whether you choose to “pre-load” the data into a staging table first.
In this tutorial, I’ll walk through a real example of loading a fixed-width data file I used for a recent data project. This example connects to a National Oceanic and Atmospheric Administration (NOAA) public Amazon S3 bucket. The data set we’re after is the weather station location data which includes the station names and coordinates.
Step 1: Create an External Stage
We’ll create an external stage in Snowflake to access the data stored in the S3 bucket. This stage acts as a reference to the location of the data without physically copying it into Snowflake storage. I like to use a specific schema for external stages which helps organize objects into logical blocks.
/*CREATE SCHEMA FOR EXTERNAL STAGES*/
CREATE OR REPLACE SCHEMA EXTERNAL_STAGES;

/*CREATE THE STAGE*/
CREATE OR REPLACE STAGE NOAA_S3
    URL = 's3://noaa-ghcn-pds/'
    DIRECTORY = (ENABLE=FALSE);
Step 2: Create a File Format
Next, we define a file format to interpret the structure of the fixed-width files in the S3 bucket. The primary difference between a fixed-width file format and a delimited file format is that the FIELD_DELIMITER option is set to NONE for the fixed-width format. Using the format below will read lines (rows) in the file as a single column.
/*CREATE THE FILE FORMAT*/
CREATE OR REPLACE FILE FORMAT EXTERNAL_STAGES.NOAA_FIXED_WIDTH
    TYPE = CSV
    FIELD_DELIMITER = NONE /*NO DELIMITER ON A FIXED WIDTH*/
    ;
Step 3: Create the Target Table in Snowflake
Before we can load the data from the S3 bucket into a Snowflake table, we have to create the target table. The NOAA S3 bucket includes a readme.txt file that defines the column spacing for the station file (ghcnd-stations.txt) file we’ll load. Use that definition to create our target table in the RAW_DATA schema created in an earlier demo.
IV. FORMAT OF "ghcnd-stations.txt"
------------------------------
Variable   Columns   Type
------------------------------
ID            1-11   Character
LATITUDE     13-20   Real
LONGITUDE    22-30   Real
ELEVATION    32-37   Real
STATE        39-40   Character
NAME         42-71   Character
GSN FLAG     73-75   Character
HCN/CRN FLAG 77-79   Character
WMO ID       81-85   Character
------------------------------
/*CREATE TARGET TABLE*/
CREATE OR REPLACE TRANSIENT TABLE RAW_DATA.NOAA_STATIONS(
    ID VARCHAR(11)
    ,LATITUDE FLOAT
    ,LONGITUDE FLOAT
    ,ELEVATION FLOAT
    ,STATE VARCHAR(2)
    ,NAME VARCHAR(30)
    ,GSN_FLAG VARCHAR(3)
    ,HCN_CRN_FLAG VARCHAR(3)
    ,WMO_ID VARCHAR(5)
);
Step 4: Using SELECT and Dollar Sign Notation to Parse the File
An advantage to using the external stage in Snowflake is that we can query the data files directly in the stage using dollar sign notation. In our example of the fixed width file, using $1 in the select query returns the data from the first (only) column in the file.
Using the data layout from the readme.txt file and combining a few SQL functions, we can parse the fixed-width record from a single column into the appropriate columns and data types using a SELECT statement; however, you’ll see that we use the stage and file name in the FROM clause like a table name and also include the FILE_FORMAT option so Snowflake knows how to interpret the file.
SELECT
NULLIF(TRIM(SUBSTRING($1,1,11)),'')::VARCHAR AS ID,
NULLIF(TRIM(SUBSTRING($1,13,8)),'')::FLOAT AS LATITUDE,
…
FROM
@EXTERNAL_STAGES.NOAA_S3/ghcnd-stations.txt
(FILE_FORMAT=>EXTERNAL_STAGES.NOAA_FIXED_WIDTH);
In the query above, we’re first using SUBSTRING to retrieve a portion of the first column in the file. Use the readme.txt file to assist with setting the starting position and length passed to the SUBSTRING. Next, we’re trimming any leading and trailing spaces from the string using TRIM. If the TRIM results in an empty string, we’ll set the value to NULL using NULLIF. Finally, we use :: to cast the resulting string into the appropriate data type.
Step 5: Loading the Data into Snowflake with COPY INTO
Using the SELECT statement prepared in the previous step we can load the data directly into our target table using the COPY INTO command. COPY INTO does exactly what it sounds like – it copies data into a table from another source.
/*TRUNCATE AND LOAD THE TABLE DIRECT*/
TRUNCATE TABLE RAW_DATA.NOAA_STATIONS;

/*LOAD THE DATA BY QUERYING THE FILE DIRECTLY*/
COPY INTO RAW_DATA.NOAA_STATIONS
FROM
(
    SELECT
        NULLIF(TRIM(SUBSTRING($1,1,11)),'')::VARCHAR AS ID
        ,NULLIF(TRIM(SUBSTRING($1,13,8)),'')::FLOAT AS LATITUDE
        ,NULLIF(TRIM(SUBSTRING($1,22,9)),'')::FLOAT AS LONGITUDE
        ,NULLIF(TRIM(SUBSTRING($1,32,6)),'')::FLOAT AS ELEVATION
        ,NULLIF(TRIM(SUBSTRING($1,39,2)),'')::VARCHAR AS STATE
        ,NULLIF(TRIM(SUBSTRING($1,42,30)),'')::VARCHAR AS NAME
        ,NULLIF(TRIM(SUBSTRING($1,73,3)),'')::VARCHAR AS GSN_FLAG
        ,NULLIF(TRIM(SUBSTRING($1,77,3)),'')::VARCHAR AS HCN_CRN_FLAG
        ,NULLIF(TRIM(SUBSTRING($1,81,6)),'')::VARCHAR AS WMO_ID
    FROM
        @EXTERNAL_STAGES.NOAA_S3/ghcnd-stations.txt
        (FILE_FORMAT=>EXTERNAL_STAGES.NOAA_FIXED_WIDTH)
);
After loading the data, Snowflake provides a status of the load indicating how many records were loaded and how many errors were encountered. More information about error handling and error limits is available in the Snowflake COPY INTO documentation.

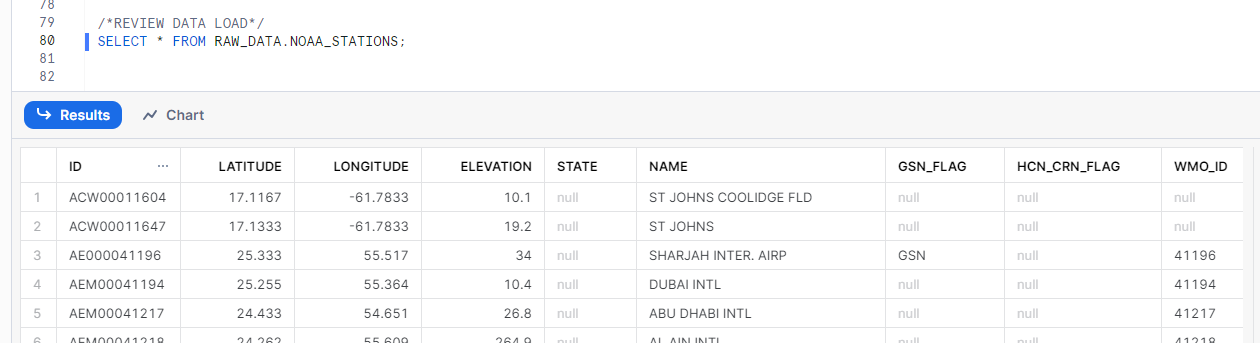
Step 5: Reviewing Data Load
Finally, let’s verify that the data has been successfully loaded into the Snowflake table with a simple SELECT statement.
SELECT * FROM RAW_DATA.NOAA_STATIONS;
Conclusion
In this tutorial, we’ve demonstrated how to set up a fixed-width data pipeline in Snowflake to ingest NOAA weather data from a public S3 bucket. Snowflake’s flexibility to connect to other cloud storage solutions as well as the powerful SQL tools help eliminate some of the barriers to traditional data pipelines.
