
It seems everywhere you look AI is booming. With so many different LLM options to choose from which one is “right” for your application? If you’ve worked with any LLM or AI model, you know that depending on how you prompt it, you can get vastly different responses. I wanted to compare how different models responded to the same prompt without going to multiple sites needing multiple API keys or building multiple apps – and by combining the new Snowflake Cortex and Streamlit, I can do just that.
In this demo, I’ll build a Streamlit app that will show side-by-side responses from one or more LLM models available in Snowflake Cortex, including the new Snowflake Arctic model! For this demo, I’ll set up a new Snowflake demo account in the AWS West region. As of the time of writing this article, Arctic is only available to accounts in this region, so it allows using all the models in Cortex. If you already have a Snowflake account, check here to see if Cortex is supported in your cloud provider and region.
Snowflake Setup
Before jumping into the Streamlit app, I’ll need to do some initial setup in my Snowflake account. At a minimum the Cortex permissions will need to be granted by the AccountAdmin role; however, I also like to go ahead and set up Streamlit-specific objects including Database, Schemas, Role, and Warehouse. The full setup script is available in my GitHub Repo.
Streamlit Setup
With my Snowflake account prepped, I can start working on my Streamlit app. For this article, I’ll assume you already have a Python Dev Environment and Streamlit installed. If not go here.
I wanted the app to have a “chatbot” feel and Streamlit’s recent updates support this out of the box. Also, by leveraging st.session_state we can show the chat history. This app will also show the responses side-by-side of one or more models, so it’ll have some dynamic elements. The number of model options to include is up to you, but I chose to set my max to five.
Library Initialization
Before adding any Streamlit elements, we’ll need to include the appropriate Python libraries for Streamlit, Snowpark, and Cortex.
#IMPORT STREAMLIT LIBRARY
import streamlit as st
#IMPORT SNOWPARK
import snowflake.snowpark as sp
#IMPORT COMPLETE FUNCTION FROM SNOWFLAKE CORTEX
from snowflake.cortex import Complete
st.set_page_config(page_title="Snowflake LLM Comparisons",layout="wide")
Header Setup
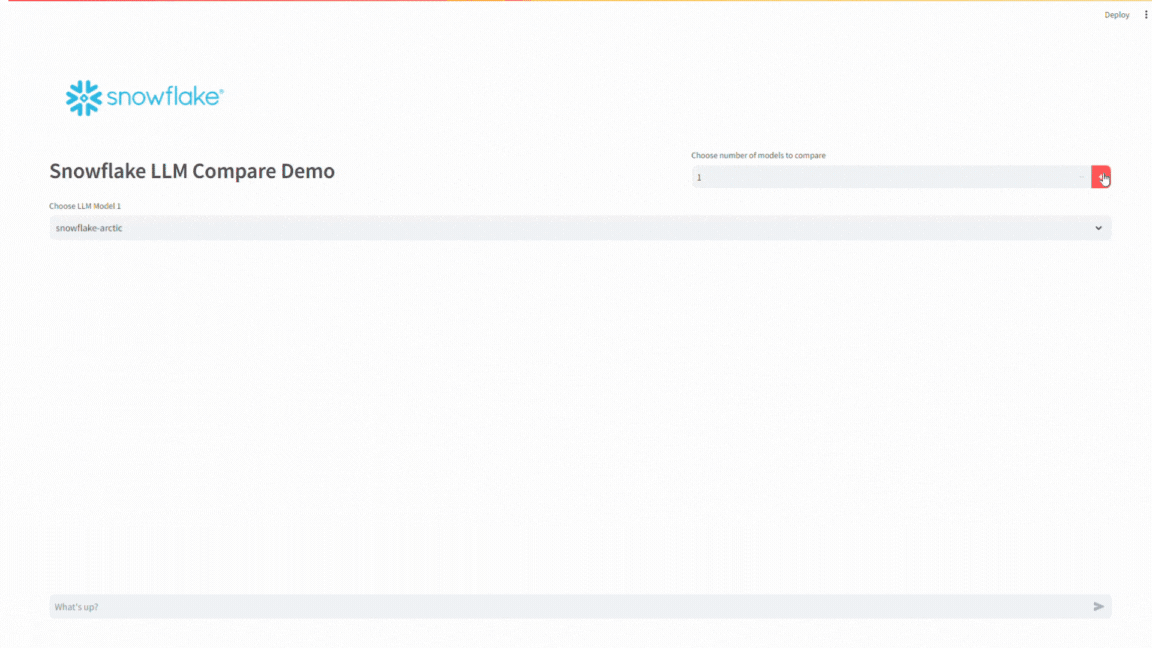
Before adding the header, let’s add the Snowflake session configuration and a list to hold the model names. Once those are set, let’s add a header bar that has the Snowflake logo, a header block, and a number chooser to set the number of models to run. Following the header, we’ll use a while loop to clear or set up appropriate st.session_state variables to store the chat history for each model.
#READ CREDS INTO DICTIONARY
creds = {
    "account":"YOUR ACCOUNT",
    "user":"YOUR USERNAME",
    "password":"YOUR PASSWORD",
    "database":"YOUR DB",
    "schema":"YOUR SCHEMA",
    "role":"YOUR ROLE",
    "warehouse":"YOUR WAREHOUSE"
}
#CREATE LLM OPTIONS
llm_models = ["snowflake-arctic",
              "reka-flash",
              "llama2-70b-chat",
              "mistral-large",
              "mixtral-8x7b",
              "mistral-7b",
              "gemma-7b"]
#ADD SNOWFLAKE LOGO, HEADER AND LLM CHOOSER
st.image(image="https://www.snowflake.com/wp-content/themes/snowflake/assets/img/brand-guidelines/logo-sno-blue-example.svg")
colHeader = st.columns([3,2])
with colHeader[0]:
    st.header("Snowflake LLM Compare Demo")
with colHeader[1]:
    mx_llms = 5
    cntLlm = st.number_input(label="Choose number of models to compare",min_value=1,max_value=mx_llms)
#INITIALIZE THE SESSION STATE
if "cntLLM" not in st.session_state:
    st.session_state.cntLLM = 0
if cntLlm != st.session_state.cntLLM:
    #CLEAR ANY EXISTING STATES
    x=0
    while x < mx_llms:
        chatHist = f"chatHist_{x}"
        if chatHist in st.session_state:
            del st.session_state[chatHist]
        if x < cntLlm and chatHist not in st.session_state:
            st.session_state[chatHist] = []
        x+=1
    st.session_state.cntLLM = cntLlm
Building the Chat Bot
Now that the header is ready and can set the number of models to compare, we can add the chat elements to the app. First, the app will need an input box. Streamlit makes this simple with the st.chat_input element. Additionally, since this will be a dynamic app, we’ll use a while loop to add select boxes and chat message boxes for the number of models chosen.
Using the complete function from Cortex, we’ll pass the user’s input to the specified model, capture the response, and then write it to the appropriate chat box. As part of the process, we’ll also write the user’s input and the model’s response to the appropriate session_state variable to keep the chat history.
#BUILD UI
#ENTER PROMPT FIRST
llm = list(range(0,cntLlm))
colChat = st.columns(cntLlm)
prompt = st.chat_input("What's up?")
if prompt:
    session = sp.Session.builder.configs(creds).create()
x=0
while x < cntLlm:
    with colChat[x]:
        chatHist = f"chatHist_{x}"
        llm[x] = st.selectbox(label=f"Choose LLM Model {x+1} ",options=llm_models,key=f"llm_{x}",index=x)
        for m in st.session_state[chatHist]:
            with st.chat_message(m["role"]):
                st.markdown(m["content"])
        if prompt:
            st.chat_message("user").markdown(prompt)
            st.session_state[chatHist].append({"role":"user","content":prompt})
            with st.chat_message("assistant"):
                resp = Complete(llm[x],prompt,session)
                st.markdown(resp)
                st.session_state[chatHist].append({"role":"assistant","content":resp})
    x+=1
App in Action
Running the app builds a simple tool that allows you to choose one or more models to test a prompt with. Enter your prompt in the input box and then press enter – it’ll send the prompt to the model(s) you selected and return the response to the screen. Depending on the prompt, this may take a few seconds per model.
Wrapping Up
Snowflake Cortex brings AI to your fingertips and pairing with Streamlit makes it easy to activate AI for a user. In this post, we setup our Snowflake account and built a simple chatbot app to send the same prompt to multiple models so the user can compare the output between models.
The full app code is also available in my GitHub Repo.
Follow me on LinkedIn and Medium for more content on Data Management and demos including Snowflake, Streamlit, and SQL Server.
