
Domo? That’s new to this blog – well, yes and no. If you look at my Credentials page, you’ll see that I have also earned some Domo Certifications. But what is Domo?
Domo revolutionizes business intelligence by transforming data into actionable insights, seamlessly integrating with existing systems to deliver real-time analytics. Oh great! Yet another BI platform. Well, yes. But there’s more to Domo than just BI. I won’t go into all the cool things that Domo does that differentiate it from other BI platforms here; however, I am going to focus on one of their newer features – Domo Cloud Amplifier for Snowflake. This article will focus first on setting up most of the required environment in Snowflake to support both read and write operations between Snowflake and Domo. Most? Yes, there are some aspects of the write connection that are Domo account-specific, I’ll cover that in another article.
All Snowflake and Domo integrations shown in this series are done using free demo accounts from both products.
Snowflake Roles
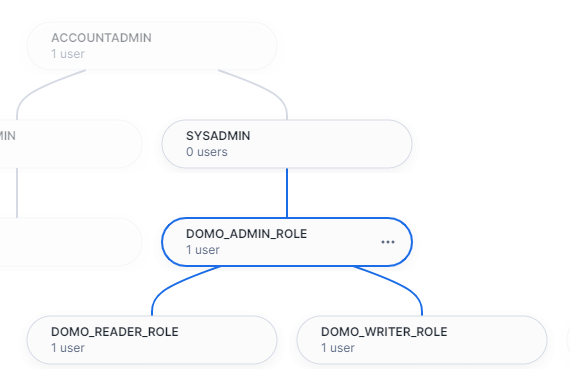
First, we’ll create three Domo-specific roles in Snowflake. Doing so now helps facilitate the separation of read and write processes in our integration. The script shown will set the following roles:
- DOMO_READER_ROLE: Primary read role from Domo.
- DOMO_WRITER_ROLE: Allows read/write capabilities from Domo.
- DOMO_ADMIN_ROLE: Parent to the read and write roles.
USE ROLE SECURITYADMIN;

/*DOMO READ ROLE */
CREATE OR REPLACE ROLE DOMO_READER_ROLE;
/*DOMO WRITE ROLE */
CREATE OR REPLACE ROLE DOMO_WRITER_ROLE;
/*DOMO ADMIN ROLE */
CREATE OR REPLACE ROLE DOMO_ADMIN_ROLE;
/*CREATE HIERARCHY */
GRANT ROLE DOMO_READER_ROLE TO ROLE DOMO_ADMIN_ROLE;
GRANT ROLE DOMO_WRITER_ROLE TO ROLE DOMO_ADMIN_ROLE;
GRANT ROLE DOMO_ADMIN_ROLE TO ROLE SYSADMIN;

/*ASSUME CURRENT USER WILL BE DOMO ADMIN */
SET CURR_USER = CURRENT_USER();
GRANT ROLE DOMO_ADMIN_ROLE TO USER IDENTIFIER($CURR_USER);
UNSET CURR_USER;
Snowflake Compute Warehouses
For Domo to read and/or write data while connected to Snowflake, we’ll need compute warehouses in Snowflake to provide the computing power for our queries. The script below creates two extra small warehouses – one for read and one for write – and assigns grants to the appropriate roles created above.
USE ROLE ACCOUNTADMIN;
/*READ WAREHOUSE */
CREATE OR REPLACE WAREHOUSE DOMO_READ_XS_WH
    WAREHOUSE_SIZE= XSMALL
    MIN_CLUSTER_COUNT = 1
    MAX_CLUSTER_COUNT = 1
    AUTO_SUSPEND = 60
    AUTO_RESUME = TRUE;

/*GRANT USASE TO READER ROLE*/
GRANT USAGE ON WAREHOUSE DOMO_READ_XS_WH TO ROLE DOMO_READER_ROLE;

/*WRITE WAREHOUSE */
CREATE OR REPLACE WAREHOUSE DOMO_WRITE_XS_WH
    WAREHOUSE_SIZE= XSMALL
    MIN_CLUSTER_COUNT = 1
    MAX_CLUSTER_COUNT = 1
    AUTO_SUSPEND = 60
    AUTO_RESUME = TRUE;

/*GRANT USASE TO WRITER ROLE*/
GRANT USAGE ON WAREHOUSE DOMO_WRITE_XS_WH TO ROLE DOMO_WRITER_ROLE;
Service Accounts for Domo
For simplicity in this demo, we’ll establish two new users as service accounts for our connection to Domo. My demo accounts are not connected to any third-party user authentication tools like Azure AD, so using service accounts keeps things simple for this demo. We’ll add each account to the appropriate Snowflake role as well.
/*DOMO READ SERVICE ACCOUNT */
USE ROLE SECURITYADMIN;
CREATE USER DOMO_READER_SVC_01
    PASSWORD = 'STRONG PASSWORD'
    DISPLAY_NAME = 'DOMO READER SERVICE ACCOUNT'
    FIRST_NAME = 'DOMO READER'
    LAST_NAME = 'SERVICE ACCOUNT'
    DEFAULT_ROLE = 'DOMO_READER_ROLE'
    DEFAULT_WAREHOUSE = 'DOMO_READ_XS_WH';
GRANT ROLE DOMO_READER_ROLE TO USER DOMO_READER_SVC_01;

/*DOMO READ WRITE ACCOUNT */
USE ROLE SECURITYADMIN;
CREATE USER DOMO_WRITER_SVC_01
    PASSWORD = 'STRONG PASSWORD'
    DISPLAY_NAME = 'DOMO WRITER SERVICE ACCOUNT'
    FIRST_NAME = 'DOMO WRITER'
    LAST_NAME = 'SERVICE ACCOUNT'
    DEFAULT_ROLE = 'DOMO_WRITER_ROLE'
    DEFAULT_WAREHOUSE = 'DOMO_WRITE_XS_WH';
GRANT ROLE DOMO_WRITER_ROLE TO USER DOMO_WRITER_SVC_01;
Domo DB
Finally, create a new database and schemas for read and write in Snowflake as well as apply proper grants to the roles for each.
USE ROLE ACCOUNTADMIN;
/*CREATE DB */
CREATE OR REPLACE DATABASE DOMO_DB;
/*MAKE DOMO ADMIN OWNER*/
GRANT OWNERSHIP ON DATABASE DOMO_DB TO ROLE DOMO_ADMIN_ROLE;
GRANT ALL ON DATABASE DOMO_DB TO ROLE DOMO_ADMIN_ROLE;
GRANT ALL ON FUTURE SCHEMAS IN DATABASE DOMO_DB TO DOMO_ADMIN_ROLE;

/*CREATE READ SCHEMA */
CREATE OR REPLACE SCHEMA DOMO_READ_SCH;
/*APPLY GRANTS TO READ ROLE */
GRANT USAGE ON DATABASE DOMO_DB TO ROLE DOMO_READER_ROLE;
GRANT USAGE ON SCHEMA DOMO_READ_SCH TO ROLE DOMO_READER_ROLE;
GRANT SELECT ON FUTURE TABLES IN SCHEMA DOMO_DB.DOMO_READ_SCH TO ROLE DOMO_READER_ROLE;
GRANT SELECT ON FUTURE VIEWS IN SCHEMA DOMO_READ_SCH TO ROLE DOMO_READER_ROLE;

/*CREATE WRITE SCHEMAS */
CREATE OR REPLACE SCHEMA DOMO_UTIL;
CREATE OR REPLACE SCHEMA S3_STAGES;
GRANT ALL ON DATABASE DOMO_DB to role DOMO_WRITER_ROLE;
GRANT ALL ON SCHEMA DOMO_DB.DOMO_UTIL to role DOMO_WRITER_ROLE;
GRANT ALL ON SCHEMA DOMO_DB.S3_STAGES to role DOMO_WRITER_ROLE;
Load Sample Data
Snowflake provides sample data in trial accounts from a share and we could use that data in the sample database to connect to Domo; however, in a “real-world” application, you’d likely have your data sitting in a Domo-specific location like we’ve configured above. Using the script below will copy the sample tables and data from the TPCH_SF1 schema to our DOMO_READ_SCH to simulate what a production Domo/Snowflake environment may look like.
USE ROLE DOMO_ADMIN_ROLE;
USE DATABASE DOMO_DB;
USE SCHEMA DOMO_READ_SCH;
USE WAREHOUSE DOMO_WRITE_XS_WH;

SET TARGET_DB = 'DOMO_DB';
SET TARGET_SCH = 'DOMO_READ_SCH';

DECLARE
    DYN_SQL STRING;
BEGIN
    LET rsTables RESULTSET :=(
        SELECT
            CONCAT_WS('.',TABLE_CATALOG,TABLE_SCHEMA,TABLE_NAME) AS SRC_TBL,
            CONCAT_WS('.',$TARGET_DB,$TARGET_SCH,TABLE_NAME) AS TGT_TBL
            FROM SNOWFLAKE_SAMPLE_DATA.INFORMATION_SCHEMA.TABLES
            WHERE TABLE_SCHEMA = 'TPCH_SF1'
        );
    LET cTables CURSOR for rsTables;
    FOR t IN cTables DO
        DYN_SQL := 'CREATE OR REPLACE TABLE '|| t.TGT_TBL || ' AS SELECT * FROM ' || t.SRC_TBL;
        EXECUTE IMMEDIATE(:DYN_SQL);
    END FOR;
END;

Wrapping Up and What’s Next
And there you have it—a solid foundation for integrating Domo with Snowflake by establishing critical roles and preparing the Snowflake environment.
In the next article, we’ll dive into connecting Domo to Snowflake and leveraging sample data to illustrate how the integration works in practice. We’ll walk through the steps to configure the connection, ensuring seamless data flow and real-time analytics. Stay tuned to see how Domo’s Cloud Amplifier for Snowflake can transform your data insights and drive better decision-making.
Remember, this series uses free demo accounts from both Snowflake and Domo, making it accessible for you to follow along and experiment on your own. Keep an eye out for the next post where we’ll bring it all together and showcase the real power of combining Domo and Snowflake.
The full set of SQL scripts are available on my GitHub Repo.
Follow me on LinkedIn and Medium for more content on Data Management and demos including Snowflake, Streamlit, and SQL Server.

2 thoughts on “Integrating Domo with Snowflake: Role Setup and Environment Preparation”