In the first article in this series, we configured the Snowflake environment for connecting Domo to Snowflake using Cloud Amplifier. This article will cover the Domo configuration for read access to Snowflake – writeback with Cloud Amplifier will require some additional configuration in the Snowflake account and I’ll cover that in another article. Let’s get Domo’d!
Connect Domo Cloud Amplifier
As in the last article, this walkthrough assumes you have at least demo Snowflake and Domo accounts. The screenshots are from my demo accounts – yours may look different but the steps to implement are the same.
First, login to your Domo account and click on the Data icon. in the top menu bar. Next, click on the Data Warehouse icon on the left menu bar. Now, click on the Domo icon in upper right corner of the “Data Wheel”. Click the + button to add a new cloud account. Next, click the Snowflake icon and then click “Add New Integration”.
Configure Snowflake Connection
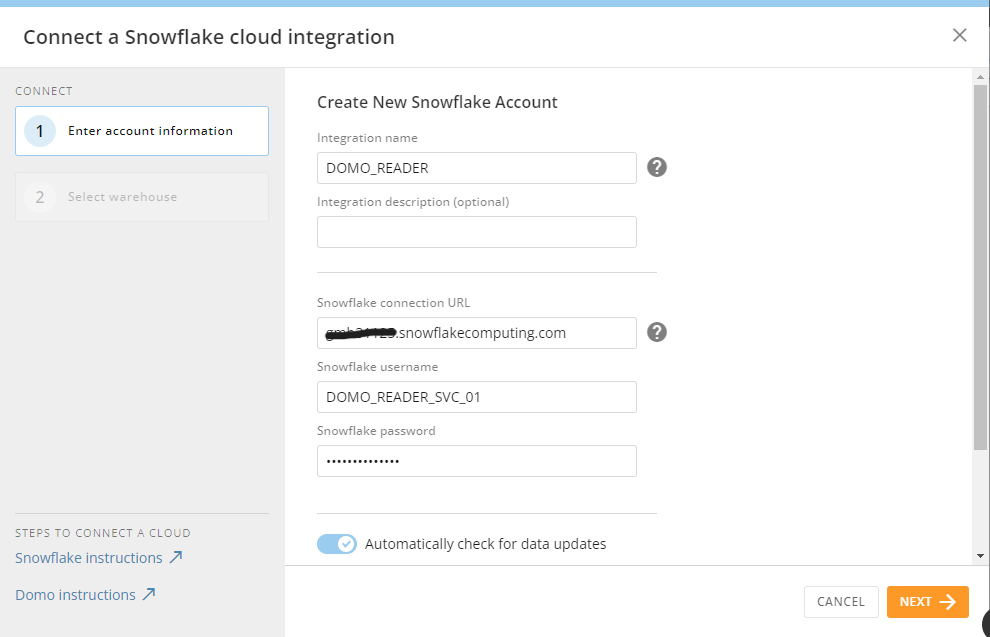
In the screen that opens after choosing “Add New Integration” in the step above, this is where you’ll need all your Snowflake information that we configured in the first article in this series. The required items for the connection are listed below:
- Integration Name: This is a unique integration name in Domo. For this demo, I’m going to use DOMO_READER because this integration will just be for reading from Snowflake
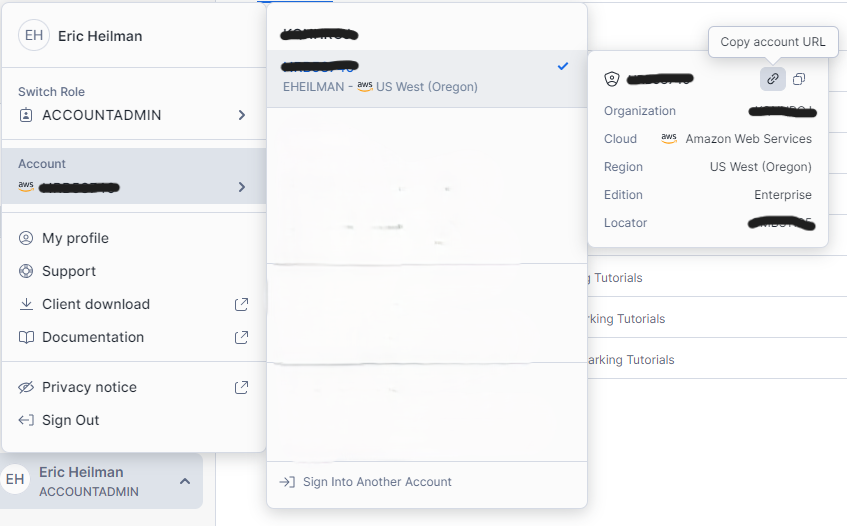
- Snowflake Connection URL: The URL for your Snowflake account which looks like XXXXXXXX.snowflakecomputing.com where the X’s represent your account. Do not include the https:// in the URL. You can get this information from your Snowflake account through Snowsight:
- Snowflake Username: username of the account to connect to Snowflake. I’ll use the reader service account created previously: DOMO_READER_SVC_01
- Snowflake Password: password for the account above
Additional Settings
In the connection setup screen there are two additional settings you may want to change based upon your use case.
- Check for data updates every: this setting is how frequently Domo will check for data changes in Snowflake. Adjusting this value to match the frequency of your Snowflake data loads/changes will help with Snowflake costs. Every “check” from Domo will consume Snowflake credits to query metadata looking for data changes. If your data only loads once a day, there’s no need for Domo to check every 15 minutes for changes.
- Cache TTL: this sets how long the data will remain cached in Domo.
After completing the fields as shown, click the Next button to continue with setup.
Configuring Read Operations
Once the connection is configured, Domo will show the list of compute warehouses the account has access to. From the operations selection box, check the QUERY option. This option will allow our connection to read from the Snowflake tables and views. After selecting Query, click Next.

Choosing Tables to Connect
This demo is only for establishing the READ portion of Cloud Amplifier. We’ll configure WRITE in another demo. Next, we’ll click on “Choose Tables to Connect”. Domo will connect to Snowflake and populate the list of Databases, Schemas and Tables/View our account has access to. Choose the tables/views you want to connect and then click “Create Datasets”. Domo will then create a Dataset for each table/view you choose.
Monitoring Domo Connection in Snowflake
So, we’ve connected Domo to Snowflake. Now what? As you use the datasets for cards, Magic ETL, etc. in Domo, queries are sent back to Snowflake to load/transform the data. For example, this simple Magic ETL in Domo generated twenty-one (21) SQL commands in Snowflake when I ran the preview.
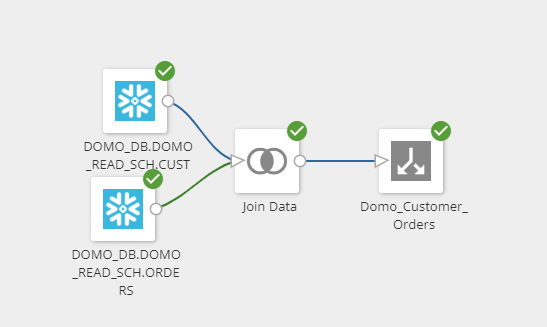
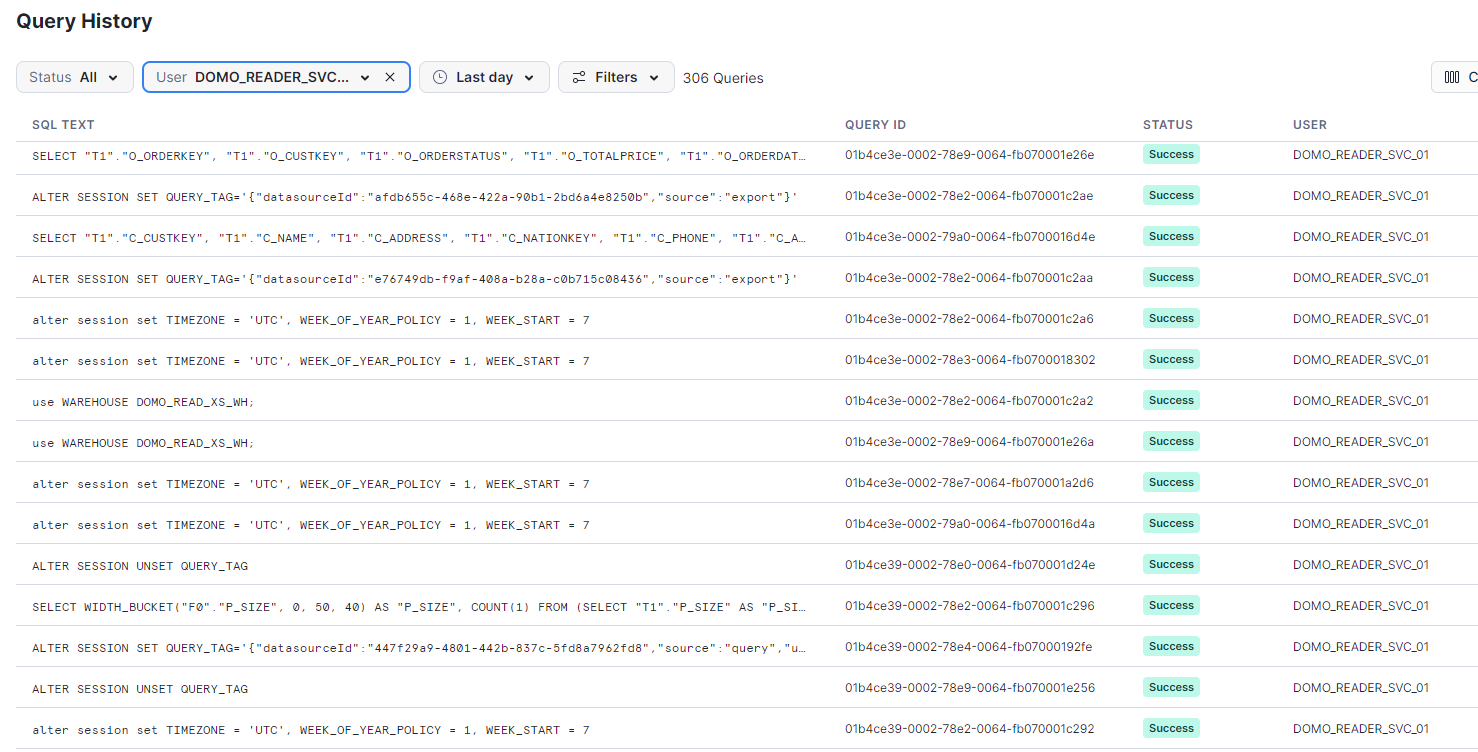
The Magic ETL shown generates a Domo dataset. In a later demo, I’ll show how to write this back to Snowflake using Magic ETL.
Wrapping Up
In this article, we walked through setting up Domo for read access to Snowflake using Cloud Amplifier. We started by logging into Domo, navigating to the Data Warehouse interface, and creating a new integration with Snowflake by configuring essential settings like the connection URL, username, and password. We also covered optimizing performance by adjusting data update frequency and cache TTL.
After establishing the connection, we configured read operations by selecting the QUERY option and choosing specific tables to create datasets within Domo. This setup allows for dynamic data visualization and analysis. Stay tuned for the next article, where we’ll explore configuring writeback capabilities to Snowflake.
Follow me on LinkedIn and Medium for more content on Data Management and demos including Snowflake, Streamlit, and SQL Server.

3 thoughts on “From Snowflake to Domo: Setting Up Seamless Read Access”