Snowflake: Loading Data from Stage

Data Engineering with Snowflake

In the previous articles in this series, we’ve created a named internal stage and connected to an Amazon S3 Bucket as an external stage. So now what? We need to load the data from the staged file to a table so that we can execute SQL Commands against the data as needed. In this post we’ll cover:

  1. Import Setup
  2. Create Target Table
  3. Copy Data
  4. File Format
    1. Use File Format with Copy Command
    2. Using File Format with Staged Data
  5. Conclusion

Import Setup

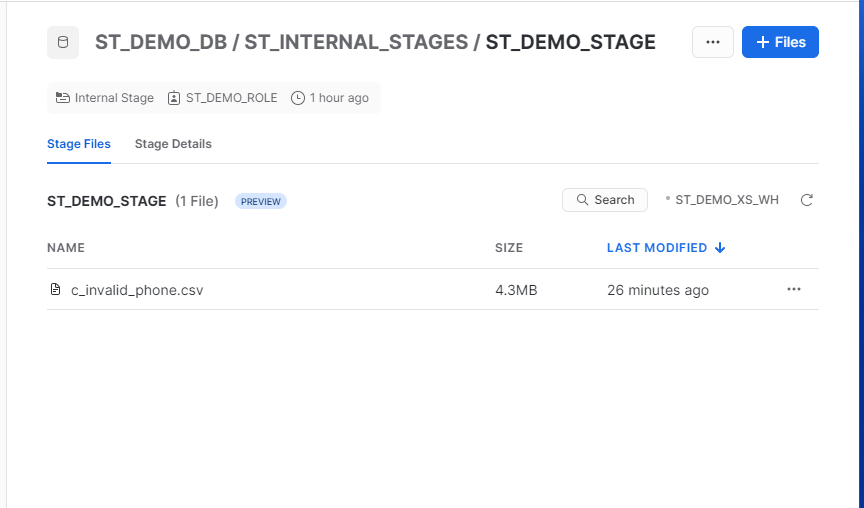
Prior to loading data from the stage location, we need to setup a target table to load into. For this example, we will use the “bad” phone number file uploaded in the internal stage from a previous post. Another cool feature of the Snowflake copy command is it can use compressed files as a source. To demonstrate this, I’ve compressed the sample file using GZip as a .gz file.

What’s in the file? This file is a .csv file with three (3) columns using a comma separator, header row and no double quotes around the data. Knowing these file format options will be important in a few steps.

Create Target Table

Now that the file format is known, we need to create the target table to load the data. The table schema should match that of the file to keep the copy command simple, or we could apply certain transformations to the copy command if we had additional columns in the target such as inserted date, or username, etc. For now, we’ll keep it the same as the source file to keep things simple. Also, for this exercise, we’ll create a new schema “RAW_DATA” and create the table in the new schema.

Notice that in the raw file, the invalid_timestamp column contains the time zone offset. To maintain this level of detail, the target column should bet setup as a TIMEZONE_TZ data type in order to maintain the same level of detail.

USE ROLE ST_DEMO_ROLE;
USE DATABASE ST_DEMO_DB;
CREATE OR REPLACE SCHEMA RAW_DATA;
USE SCHEMA ST_DEMO_DB.RAW_DATA;
CREATE TABLE C_INVALID_PHONE
    (
    PHONE_NUMBER VARCHAR(15),
    INVALID_REASON VARCHAR(50),
    INVALID_TIMESTAMP TIMESTAMP_TZ
    );

Copy Data

We’ve now created the target table and we can load the contents of the file from the stage location using the COPY command. Remember those file format details we mentioned earlier? You’ll need them here. We will need to specify what the format of the file is in order to load the data.

TRUNCATE TABLE ST_DEMO_DB.RAW_DATA.C_INVALID_PHONE;

COPY INTO ST_DEMO_DB.RAW_DATA.C_INVALID_PHONE
FROM @ST_DEMO_DB.ST_INTERNAL_STAGES.ST_DEMO_STAGE
FILES = ('c_invalid_phone.csv.gz')
FILE_FORMAT = (
    TYPE=CSV
    COMPRESSION=GZIP
    SKIP_HEADER=1
    FIELD_DELIMITER=','
    )

Notice that we specify the target we’re copying into, the source we’re copying from, the file name, and the file format parameters from earlier. I also included a TRUNCATE command on the table to ensure that the target is empty. Additionally, that clears any of the metadata associated with prior file loads. Snowflake keeps track of the files loaded to a table and unless specified in the command, won’t load the data a second time.

The copy into command also can accept a regex expression for the file pattern. This is especially helpful if loading multiple files that all have a similar naming convention.

After running the command above, you’ll get an output like the one below showing how many rows were parsed in the file and how many loaded. Other options in the copy command such as VALIDATION_MODE and SKIP_FILE can help identify errors on a load, but we’re not going to cover those in this post.

File Format

Now that we have the target table created and loaded it, we’re all set, right? Well, technically. We can load the data including all the file format parameters in the copy command as shown above. If this were a one-time load of a file that may make the most sense; however, most data engineers are building processes, and who wants to keep writing (or copying) the same code over and over?

With Snowflake file formats you can create a file format object and then reference it in the copy command. An advantage to creating file formats is they are not necessarily file specific, you can create generic ones and use them in multiple load processes. File formats can even be applied to stages if all the files in the stage are the same format, which can also save some coding time.

First, let’s create the new file format object in the RAW_DATA schema for our sample file. In the example below, I used the file format name to describe the file. Doing so on a regular basis could make for long file format names, so adjust the name accordingly based upon your organization’s naming convention rules. I like to start it with “FMT” to indicate the object is a file format.

USE ROLE ST_DEMO_ROLE;
USE SCHEMA ST_DEMO_DB.RAW_DATA;

CREATE OR REPLACE FILE FORMAT FMT_CSV_GZIP_SKIP_HEADER_1
    TYPE = CSV /*CSV INDICATES A TEXT-BASED FILE*/
    COMPRESSION = GZIP /*FILES ARE GZIP COMPRESSED*/
    SKIP_HEADER = 1 /*SKIP FIRST ROW (CONTAINS HEADER) */
    FIELD_DELIMITER=',' /*COLUMNS ARE DELIMITED BY COMMA*/
    ;

Use File Format with Copy Command

Now that we’ve setup our file format, we can use it in our copy command. Again, notice the TRUNCATE command is in play so that we can reload the same file a second time.

TRUNCATE TABLE ST_DEMO_DB.RAW_DATA.C_INVALID_PHONE;

COPY INTO ST_DEMO_DB.RAW_DATA.C_INVALID_PHONE
FROM @ST_DEMO_DB.ST_INTERNAL_STAGES.ST_DEMO_STAGE
FILES = ('c_invalid_phone.csv.gz')
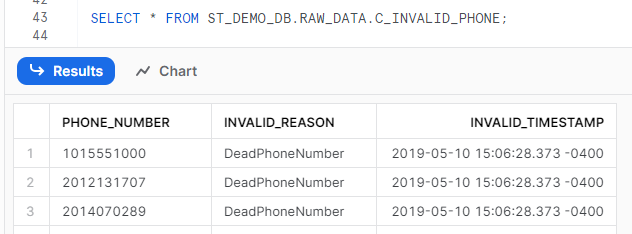
FILE_FORMAT = (FORMAT_NAME = FMT_CSV_GZIP_SKIP_HEADER_1);

Now that the file is loaded to our table, we can select the data as we would with a normal table:

Using File Format with Staged Data

A file format can also be used to query data directly from a stage location, treating the staged file as a table of sorts. One caveat to doing so is you cannot use “SELECT *” to get all the columns in the file, so you will need to know the schema of the file to query it. Columns in the staged table are referenced with $ notation in which columns are referenced in the pattern for $COL_NO, where COL_NO is the column number of the file, starting with 1. There are also “hidden” metadata columns you can reference as well.

SELECT
$1 as PHONE_NUMBER,
$2 as REASON,
$3 as TIMESTAMP,
METADATA$FILENAME as STG_FILE
FROM @ST_DEMO_DB.ST_INTERNAL_STAGES.ST_DEMO_STAGE
(
FILE_FORMAT => FMT_CSV_GZIP_SKIP_HEADER_1
,PATTERN => 'c_invalid_phone.csv.gz'
);

Conclusion

Loading data from a staging location can be done in just a few commands and is one of the many powerful tools in the Snowflake toolbox. In this post, we covered:

  • creating a table
  • loading a file from a stage location
  • creating a file format
  • loading data from stage using the file format
  • querying data in a stage directly

Imagine the endless possibilities for your clients or organization for loading data to Snowflake, and this is only scratching the surface!

Snowflake: Connect to S3 Bucket

Create An Amazon S3 External Stage

External stages with cloud providers such as Amazon AWS, Google Cloud Platform or Microsoft Azure can be thought of as “windows” from Snowflake to a set of files in an outside location. Like an internal stage, an external stage can be created with just a few lines of code. To keep the internal and external stages separate, we’ll also create a new schema for our external stage.

We’ll use an open source data set from Amazon S3 for the NOAA Global Surface Summary of the Day, a weather related data set. Because it is an open data source, we won’t need to supply a username or password when creating our stage. For non-public sources, there are a few additional steps needed to connect; however, that’s out of scope for this post.

Create New Schema and External Stage

In the previous post, we already created a demo database and role(s) needed for this example, as well as granted the appropriate permissions for each. We’ll continue using our same demo setup to create the external stage.

/*USE DEMO ROLE & DATABSAE*/
USE ROLE ST_DEMO_ROLE;
USE DATABASE ST_DEMO_DB;
/*CREATE THE SCHEMA*/
CREATE OR REPLACE SCHEMA ST_EXTERNAL_STAGES;
/*CREATE THE STAGE*/
CREATE OR REPLACE STAGE ST_DEMO_S3_STAGE
   URL = 's3://noaa-gsod-pds/2023'
   DIRECTORY = (ENABLE=TRUE);

Since our demo s3 bucket is public, no additional credentials are needed to create the stage. If creating a stage using a non-public bucket, you’ll needed to specify the AWS KEY ID and AWS SECRET KEY, or if you own the AWS Bucket, set up a STORAGE INTEGRATION in Snowflake and enable access through AWS.

List Files in External Stage

A common tendency to list the files in a stage is to try “SELECT * FROM STAGE_NAME” (we are SQL Developers after all…), which results in an error. In order to list the files from an external, or internal, stage, we can use the LIST command, followed by the name of the stage. In order to reference a stage in the list command, you’ll need to add “@” prior to the name(i.e. @ST_DEMO_DB.ST_EXTERNAL_STAGES.ST_DEMO_S3_STAGE). Using the LIST command results in the following:

List Files with DIRECTORY

When creating the s3 stage, we also enabled directory tables on the stage. With that feature enabled, we can also use the DIRECTORY table function to query the list of files with a SELECT statement.

SELECT * FROM DIRECTORY(@ST_DEMO_DB.ST_EXTERNAL_STAGES.ST_DEMO_S3_STAGE);

Conclusion

Connecting to an S3 bucket with Snowflake is relatively simple with Snowflake’s built in integrations. We’ve now created an internal and external stage with Snowflake using SQL, but what how to we use those staged files to load data in? We’ll discuss that in the next post in this series and load the data from our internal stage location to a table using the COPY command.

Snowflake: Getting Started with Stages

One of the most fundamental tools in the toolbox for data developers is loading a data file from a staging, or landing, location into a database. From there the possibilities are endless to transform the data through code to fit your needs. For a lot of developers with on-premises solutions, this takes the form of an SFTP location or a local file share. But with the rapid growth of cloud-based solutions, the tools and methods are changing. I’ve been working a lot with Snowflake lately, so let’s dive into staging data for Snowflake.

Snowflake Stage Options

Snowflake supports a two different options for staging data files; internal and external stages. Internal stages are similar to an SFTP location where you can push (PUT) a file to the target location and then access it from Snowflake as if it were sitting on the “server” for your database. An external stage is a file share hosted on a 3rd party cloud provider, such an Amazon S3 bucket. Snowflake supports external stages hosted on Amazon AWS, Google Cloud Platform or Microsoft Azure.

In this post we’ll create an internal stage, and in a future post, we’ll create an external Amazon S3 stage with an open source data set. Additionally, we’ll assume you have at least a trial account with Snowflake. If you don’t have a Snowflake account, you can set up a free trial account in just a few minutes.

Create An Internal Stage

Before we can put a file into our stage, we have to create it within our Snowflake instance. Creating an internal stage can be done with just a few lines of code. In the code samples below, we will setup the demo environment which will include the the following:

  1. ST_DEMO_ROLE user role
  2. ST_DEMO_WH warehouse
  3. ST_DEMO_DB database
  4. ST_INTERNAL_STAGES schema
  5. ST_DEMO_STAGE internal stage

Create New User Role

Creating a role isn’t a necessity in a trial account because you could simply run all this code as the ACCOUNTADMIN role and have hardly any issues with permissions; however, that’s not how things are in the “real world”. In order to simulate real-world conditions and follow recommended best practices, we’ll setup a new user role.

Snowflake best practices recommend managing users and roles with the SECURITYADMIN role which is inherited by the ACCOUNTADMIN role, but can also be granted to specific users who will manage security. Additionally, we’ll grant the new role to the SYSADMIN role so that any objects created in the new role will be inherited by SYSADMIN. Snowflake recommends doing so as best practice since SYSADMIN role cannot be removed, and will remain in place should a user account or user role be removed from the Snowflake account.

In a new SQL Worksheet change to the SECURITYADMIN role, create the new role, GRANT the new role to the current user and the SYSADMIN role.

USE ROLE SECURITYADMIN;
CREATE OR REPLACE ROLE ST_DEMO_ROLE;

SET current_user = CURRENT_USER();
GRANT ROLE ST_DEMO_ROLE TO USER IDENTIFIER($current_user);
GRANT ROLE ST_DEMO_ROLE TO ROLE SYSADMIN;

The code block above also shows an example of creating a Snowflake SQL variable and then using the IDENTIFIER function to grant the role to the current user. This isn’t necessary as we could simply type out the specific username to grant the role to, but by using the variable, this block of code is reusable for any user.

Create ST_DEMO_XS_WH Warehouse

A Virtual Warehouse, or “warehouse”, is a cluster of compute resources in Snowflake. A warehouse is needed for tasks such as running queries, performing DML tasks or loading data. The warehouse provides resources like CPU, memory and temporary storage needed for these tasks. Warehouses can scale up, meaning “more power”, or scale out, meaning “more nodes”. In our demo, we’ll use an extra small (XS) warehouse with a single cluster. Creating a stage and loading a file doesn’t need much “horsepower” and a smaller warehouse will consumer fewer credits.

In the code block below, we’ll create a new warehouse, set a few properties like size, number of clusters and the auto suspend time in seconds. Auto Suspend shuts down the warehouse after is has been idle for the set number of seconds in order to conserve credits as well. Auto Resume will restart the warehouse automatically from a suspended state if a query or action in Snowflake requires a warehouse. Additionally, we will need to transfer ownership on the warehouse our newly created role in order to use the warehouse for queries later. Note, this is not necessarily best security practice, but simplifies some of the permissions for this demo.

USE ROLE ACCOUNTADMIN;
CREATE OR REPLACE WAREHOUSE ST_DEMO_XS_WH
    WAREHOUSE_SIZE = XSMALL
    MIN_CLUSTER_COUNT = 1
    MAX_CLUSTER_COUNT = 1
    AUTO_SUSPEND = 600
    AUTO_RESUME = TRUE
    ;
GRANT USAGE ON WAREHOUSE ST_DEMO_XS_WH TO ROLE ST_DEMO_ROLE;

Create ST_DEMO_DB Database

Next, we’ll create a new database that will house our stage and also transfer ownership of the database to the new ST_DEMO_ROLE role. By transferring ownership we will grant all rights on to the users in the ST_DEMO_ROLE such as creating schemas, tables and other objects. This keeps things simple for demo purposes; however, is not necessarily recommended best practice. Database ownership should be assigned in accordance with your individual or company security policies.

USE ROLE ACCOUNTADMIN;
CREATE OR REPLACE DATABASE ST_DEMO_DB;
GRANT OWNERSHIP ON DATABASE ST_DEMO_DB TO ROLE ST_DEMO_ROLE;

Create Schema and Stage Objects

Next, we’ll create a new schema and stage object in that schema in the new ST_DEMO_DB. Schemas provide a method of organizing your objects into logical groups as needed for your requirements. Schemas also provide a way to apply security policies as needed. For example, perhaps only developers can access certain schemas, while admins or development managers can access all schemas.

To create the schema and stage, first we’ll switch to the ST_DEMO_ROLE role and ST_DEMO_DB database. Next create the schema object and finally create the internal stage. Additionally, we’ll enable the directory view on the stage. Enabling directory opens up a number of additional options when working with stages. We will be using the ability to enumerate the files in the stage for this demo in a later step.

USE ROLE ST_DEMO_ROLE;
USE DATABASE ST_DEMO_DB;
CREATE OR REPLACE SCHEMA ST_INTERNAL_STAGES;
CREATE OR REPLACE STAGE ST_INTERNAL_STAGES.ST_DEMO_STAGE
    DIRECTORY = (ENABLE=TRUE);

Now that all the objects have been created, in the Snowsight UI, switch to the ST_DEMO_ROLE, click on Data | Databases and your object tree should look similar to what’s shown below.

Upload a File to Snowflake with Snowsight

Now that we’ve created a place to land our file, we can upload a file using the Snowsight. Currently, files are limited to 50mb from Snowsight. To upload file file, click on the ST_DEMO_STAGE in the object tree and then click on the +Files button in the upper right corner.

Next, drag or browse to the file you wish to upload to the stage, and click upload. Below we’re uploading a .csv file of invalid phone numbers from a calling campaign.

Once the file is uploaded, we can see the file listed in the stage view since we enabled the directory option when creating the stage. Snowflake may warn you that a warehouse is needed to view the files, if so, choose the demo warehouse ST_DEMO_XS_WH.

From here the file can be copied into a Snowflake table, removed, renamed, etc. But for now, we’re simply focusing on staging the file for use later.

Staging a File to Internal Stages with SnowSQL

SnowSQL is a stand alone command line interface for connecting to Snowflake and executing SQL queries and other commands. Files can also be loaded to an internal stage with a PUT command using SnowSQL without the 50mb limitations. Installation and configuration details for SnowSQL can be found in the Snowflake Documentation. I’m not going to cover SnowSQL in detail here as covering all the options for install and configuration could be its own post, I only mention it here as an additional option for staging files to Snowflake.

Conclusion

In this post we covered the basics of getting started with Snowflake data loading and stepping through the process of creating a stage and uploading a file. Over the next few posts, we’ll cover creating an external stage with an open source Amazon S3 bucket and using Python with Snowpark to post a file to an internal stage.