Secure Domo-Snowflake Connection: Service Accounts Guide

In previous articles, I showed how to seamlessly connect Domo to Snowflake using Cloud Amplifier for both read and write access. In those examples, I set up a “service” account that still had a username and password.

Since I wrote that article, Snowflake has enhanced user accounts to provide a true service account option. This account does not have a password nor can it interactively login using Snowsight. Additionally, a network policy can be assigned to this user to limit where this user can connect. Domo provides the list of IPs it uses, so we’ll create a network policy to prevent our Domo Service account from connecting apart from Domo.

Creating the Network Policy

First, I’ll create a new network policy on my Snowflake account to limit traffic to just the Domo IPs. The full list of Domo’s IPs is in the Domo documentation.

USE ROLE ACCOUNTADMIN;
CREATE OR REPLACE NETWORK POLICY DOMO_INBOUND_NETWORK_POLICY
    ALLOWED_IP_LIST = (
         '3.214.145.64/27'
        ,'54.208.87.122/32'
        ,'54.208.94.194/32'
        ,'54.208.95.167/32'
        ,'54.208.95.237/32'
        ,'34.198.214.100'
        ,'34.202.52.248'
        ,'13.92.125.193/32'
        ,'40.76.8.174/32'
        ,'35.82.136.240/28'
        ,'52.62.103.83/32'
        ,'15.222.16.24/29'
        ,'52.18.90.222/32'
        ,'54.168.46.79/32'
    )
COMMENT = 'Network policy for Domo Service Accounts'

Convert Users to Service Accounts

Since my users already exist, I can easily convert them to service type accounts with an ALTER USER command. I’ll also need to assign an RSA key to the user. This article assumes that you already have an RSA key pair, or can generate one. Snowflake also has good documentation on how to create an RSA Key Pair.

USE ROLE ACCOUNTADMIN;
ALTER USER DOMO_READER_SVC_01
    SET TYPE=SERVICE;
ALTER USER DOMO_READER_SVC_01
    SET NETWORK_POLICY = DOMO_INBOUND_NETWORK_POLICY;
ALTER USER DOMO_READER_SVC_01
    SET RSA_PUBLIC_KEY = 'ENTER PUBLIC KEY HERE';
	
USE ROLE ACCOUNTADMIN;
ALTER USER DOMO_WRITER_SVC_01
    SET TYPE=SERVICE;
ALTER USER DOMO_WRITER_SVC_01
    SET NETWORK_POLICY = DOMO_INBOUND_NETWORK_POLICY;
ALTER USER DOMO_WRITER_SVC_01
    SET RSA_PUBLIC_KEY = 'ENTER PUBLIC KEY HERE';
		

Reconnect Cloud Amplifier

Now that I have updated my users, I can go back into my Domo Cloud Amplifier setup and convert the connection from using username and password to using the Key Pair. Notice once I enter the integration screen, Domo recommends using a key pair.

Current Cloud Amplifier Connection

Choose the key pair option (username stays the same). Upload the .p8 private key file and enter the password for your encrypted key. Once complete, click NEXT.

Updated Connection to Use Key Pair

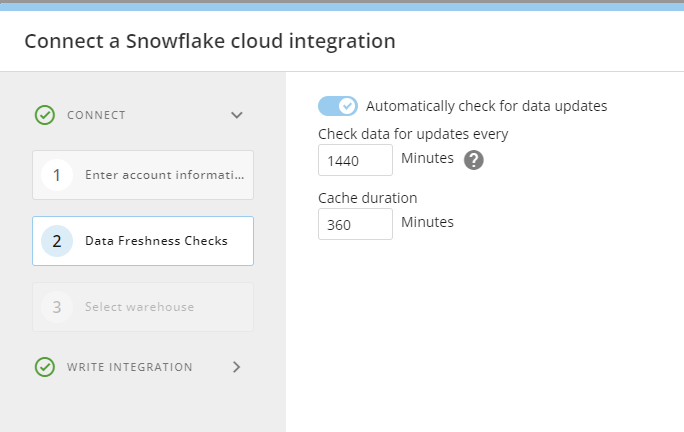
Once the authentication is changed and the account is connected, the data freshness check options appear.

Data Freshness Check Options after Successful Connection

Congratulations! You’ve now connected Domo to Snowflake securely.

Wrapping Up

In this article, I showed how to convert your existing “service” accounts from users to true service accounts in Snowflake, assign a network policy to the accounts to limit connections, and connect Domo to Snowflake securely using the updated service accounts.

I’m happy to see that Snowflake and Domo have security in mind with their connection options and secure connections can be created in just minutes – keeping your data safe without compromising end-user experience.

Efficiently Load Excel Files to Snowflake Without ETL Tools

Excel is everywhere! As a data professional, when I hear that the source data is coming from Excel – it causes a visceral reaction knowing there are a lot of potential pitfalls in getting the data from Excel into any database system. Loading an Excel file to Snowflake is no picnic, or is it? Sure, we could use an ETL tool to load the data from Excel to a Snowflake table; however, if we leverage several Python libraries that are pre-loaded into Snowflake, we can load the Excel file in just a few simple steps – all within Snowflake.

Prep Work

The code samples shown assume the desired Excel file is already loaded into an internal Snowflake stage and the user executing the code has proper use/table creation privileges on the stage and target database schema in Snowflake. For the purposes of the demo, I used a sample Excel file from thespreadsheetguru.com

If you’re working with a new Snowflake demo account and need to setup an environment to match the next few code samples, the initial setup script for my environment is on my GitHub Repo.

Confirm Excel File Location

First, let’s confirm our desired Excel file is loaded to our demo stage location. Running the query below will list the files in my Snowflake stage.

USE ROLE ST_DEMO_ROLE;
USE SCHEMA ST_DEMO_DB.ST_INTERNAL_STAGES;
USE WAREHOUSE ST_DEMO_XS_WH;

LIST @ST_DEMO_STAGE;
Employee Sample Data Excel file on ST_DEMO_STAGE

Python Worksheet

Next, create a new Python worksheet in Snowsight. We’ll need to include a few packages first, so on the Packages drop down, under “Anaconda Packages” add pandas and openpyxl

Add Packages to Python Worksheet

Next, we’ll add pandas and os to our list of imports at the top of our script. The os library will be used to assist with joining file paths – not necessary, but helpful to simplify code.

import snowflake.snowpark as snowpark
from snowflake.snowpark.functions import col
import pandas as pd
import os

Capture Excel Sheet Names

Now, we’re ready to read use pandas to read our Excel file from the stage location. To confirm we have captured the Excel file properly, we’ll temporarily return a Snowpark dataframe containing the sheet names in the file. In this case, the file only has one sheet named “Data”.

def main(session: snowpark.Session): 
    #SET THE FULL STAGE PATH
    str_stg_name = "@ST_DEMO_DB.ST_INTERNAL_STAGES.ST_DEMO_STAGE"
    #SET THE DESIRED EXCEL FILE NAME
    str_excel_file = "Employee Sample Data.xlsx"
    #STREAM THE EXCEL FILE TO AN PANDAS EXCEL OBJECT WITH FILE STREAM
    xl_file = pd.ExcelFile(session.file.get_stream(os.path.join(str_stg_name,str_excel_file)))
    #CAPTURE THE SHEET NAMES
    sp_df = session.createDataFrame(xl_file.sheet_names,schema=["Sheet Name"])
    return(sp_df)
Python Excel Sheet Names

Read Excel Sheet to Screen

Now that we’ve confirmed that the file is accessible and we can get the sheet names, let’s capture that data into a data frame and return it to the screen. With just a few simple modifications to our script above, we can do just that!

def main(session: snowpark.Session): 
    #SET THE FULL STAGE PATH
    str_stg_name = "@ST_DEMO_DB.ST_INTERNAL_STAGES.ST_DEMO_STAGE"
    #SET THE DESIRED EXCEL FILE NAME
    str_excel_file = "Employee Sample Data.xlsx"
    #STREAM THE EXCEL FILE TO AN PANDAS EXCEL OBJECT WITH FILE STREAM
    xl_file = pd.ExcelFile(session.file.get_stream(os.path.join(str_stg_name,str_excel_file)))
    #READ THE "DATA" SHEET TO PANDAS DATA FRAME
    data_df = pd.read_excel(xl_file,sheet_name="Data")
    #CONVERT PANDAS TO SNOWPARK DF
    sp_df = session.createDataFrame(data_df)
    #RETURN THE DATA
    return(sp_df)
Excel Data Output to Screen

Write Excel Sheet to Snowflake

Great! Now we’ve confirmed we can read the data from the Excel file. Next, let’s write it to a transient table in Snowflake in the RAW_DATA schema. I’ll also set the auto_create_table and overwrite options to TRUE so Snowflake will create the table if it doesn’t exist, or overwrite it if it does. These settings are for the purposes of re-running this demo code; however, adjust them as needed for your specific situation.

def main(session: snowpark.Session): 
    #SET THE FULL STAGE PATH
    str_stg_name = "@ST_DEMO_DB.ST_INTERNAL_STAGES.ST_DEMO_STAGE"
    #SET THE DESIRED EXCEL FILE NAME
    str_excel_file = "Employee Sample Data.xlsx"
    #SET THE DESIRED TARGET TABLE
    str_snow_table = "EMPLOYEE_DATA"
    #STREAM THE EXCEL FILE TO AN PANDAS EXCEL OBJECT WITH FILE STREAM
    xl_file = pd.ExcelFile(session.file.get_stream(os.path.join(str_stg_name,str_excel_file)))
    #READ THE "DATA" SHEET TO PANDAS DATA FRAME
    data_df = pd.read_excel(xl_file,sheet_name="Data")
    #WRITE THE DATA TO SNOWFLAKE
    session.write_pandas(df=data_df,table_name=str_snow_table,table_type='transient',auto_create_table=True,overwrite=True)
    #RETURN THE LIST OF TABLES IN RAW_DATA FOR CONFIRMATION
    sp_df = session.sql("SHOW TABLES LIKE 'EMPLOYEE%'")
    #RETURN THE DATA
    return(sp_df)
EMPLOYEE_DATA Table Details
Employee Data in Snowflake Transient Table

Conclusion

By leveraging Python libraries pre-loaded into Snowflake, we can efficiently load Excel files into Snowflake in a few simple steps, avoiding the complexity of traditional ETL tools. In this demo, we walked through how to prepare, read, and write Excel data to Snowflake from a Python worksheet. This could easily be extended to run as a procedure and include much more dynamic methods of determining file names, sheet names and/or the table target.

Follow me on LinkedIn and Medium for more content on Data Management and demos including Snowflake, Streamlit, and SQL Server.

Leveraging Domo’s Data Connectors for Seamless Snowflake Integration

So far in the Domo / Snowflake Cloud Amplifier series we covered connecting Snowflake to Domo for both read and write access. Now what? Domo has hundreds of different data connectors and we can now use those to write data directly to Snowflake.

Let’s use the Atom RSS Feed connector in Domo to capture the latest RSS feed from my blog (ericheilman.com) and drop the feed right into my Snowflake account with Cloud Amplifier.

Domo Setup

First, log in to Domo, click Data, then click Connectors. Search for Atom RSS and then click the Atom RSS icon. Enter the URL for the RSS feed (mine or whatever feed you want). Click Next.

RSS Feed URL Setup

Establish whatever schedule you’d like. For demo purposes, I’ll set this to Manually so that it only runs once. This will help save on Domo and Snowflake credits. In a production environment, you’d set this to run as needed to meet your needs.

Update Domo Load Schedule

On the last screen is where we need to make a small change to write the data directly to Snowflake. First, give your dataset a meaningful name and description. Then change the selection box for “Add Dataset to Cloud” from Domo to the Snowflake Cloud Amplifier option. Making that change will write the data directly to Snowflake. Click “Save and Run”.

Set Domo to Write to Snowflake

Domo will now pull the RSS Feed from my blog and write the data directly to my configured Snowflake account. As noted in my last post, Domo will write to a “cust_mmmm” schema in Snowflake. Hopefully, this will be more configurable in the future. Below is an animated walkthrough of the steps above.

Full RSS Setup

RSS Data in Snowflake

Now that the Data Set has run, let’s look at Snowflake. Notice that in the cust_mmmm schema, there’s a table matching the name of our Domo Data Set. We can query it just like any other Snowflake table but note that the column names are set by the connector. In this case, the column names are lowercase and need to be wrapped in quotes.

RSS Data Table in Snowflake

With the data in Snowflake, that opens up all kinds of possibilities for advanced data work. A quick example would be to use the Snowflake Cortex Summarize function to summarize the articles in the feed.

SELECT
    "item_pubDate"::DATE as ITEM_PUBLISH_DATE,    
    "item_title" AS ITEM_TITLE,
    SNOWFLAKE.CORTEX.SUMMARIZE("item_encoded") AS ITEM_SUMMARY
From
    ERICHEILMAN_BLOG_RSS;
Blog Summary Output

Conclusion

Integrating Domo with Snowflake through the Cloud Amplifier significantly enhances your data management capabilities. Using Domo’s vast array of connectors, you can seamlessly transfer data, such as an RSS feed, directly into Snowflake. This setup not only simplifies the data ingestion process but also leverages Snowflake’s powerful analytics tools for advanced data processing.

The example provided demonstrates how straightforward it is to configure and run this integration, paving the way for more efficient and versatile data workflows. With data in Snowflake, you’re equipped to unlock deeper insights and drive better decision-making.

Follow me on LinkedIn and Medium for more content on Data Management and demos including Snowflake, Streamlit, and SQL Server.