With the emergence and rapid innovation of AI and ML, especially from Snowflake, the basics are often overlooked for the “new and exciting”. One of the most fundamental aspects of managing a Snowflake account and environment is ensuring proper security and access controls. Snowflake relies on role-based access control (RBAC). Ideally, roles are hierarchical to allow the assignment of user least privilege appropriately.
In this blog post, we’ll walk through a Snowflake script designed to create and manage roles hierarchically. This script ensures that all necessary roles are created and correctly assigned, streamlining the process of role management.
Step 1: Setting Up the Environment
To begin, ensure we are operating with the correct role and warehouse to create the roles and grants. This could be a native Snowflake role like ACCOUNTADMIN or SECURITYADMIN, or depending on your account setup, could be a DBA or InternalAdmin role. For this example, I’ll use the default ACCOUNTADMIN role and COMPUTE_WH warehouse from my demo account.
USE ROLE ACCOUNTADMIN;
USE WAREHOUSE COMPUTE_WH;
Step 2: Creating a Temporary Table for Role Hierarchy
The next step is to create a temporary table to hold the role hierarchy. This table will store pairs of child and parent roles, defining the structure of the role hierarchy. Additionally, to we’ll also include a shared child role “ST_CORTEX_USERS” that would be used for granting access to Snowflake Cortex AI functions:
/*CREATE TEMP TABLE TO HOLD ROLE HIERARCHY*/
CREATE OR REPLACE TEMPORARY TABLE ROLE_HIER(CHILD_ROLE STRING,PARENT_ROLE STRING);
INSERT INTO ROLE_HIER(CHILD_ROLE,PARENT_ROLE)
VALUES
('ST_DEV_MGR','ST_MGR'),
('ST_ANLY_MGR','ST_MGR'),
('ST_DEV','ST_DEV_MGR'),
('ST_ANLY','ST_ANLY_MGR'),
('ST_MGR','SYSADMIN'),
('ST_CORTEX_USERS','ST_DEV'),
('ST_CORTEX_USERS','ST_ANLY');
Step 3: Creating Roles Dynamically
With the hierarchy defined, we need to ensure that all roles specified in our hierarchy exist. The following block declares a cursor to iterate over all unique roles in our temporary table and creates them if they do not already exist:
/*CREATE ROLES IF NOT ALREADY IN THE ACCOUNT*/
DECLARE
    DYN_SQL STRING;
BEGIN
    LET rsRoles RESULTSET :=(
        SELECT ROLE_NAME FROM(
            SELECT CHILD_ROLE AS ROLE_NAME FROM ROLE_HIER
            UNION SELECT PARENT_ROLE FROM ROLE_HIER
            ) GROUP BY ROLE_NAME
        );
    LET cRoles CURSOR for rsRoles;
    FOR r IN cRoles DO
        DYN_SQL := 'CREATE ROLE IF NOT EXISTS '|| r.ROLE_NAME;
        EXECUTE IMMEDIATE(:DYN_SQL);
    END FOR;
END;
Step 4: Granting Child Roles to Parent Roles
After ensuring all roles exist, we need to assign the child roles to their respective parent roles. Again, the code below creates a cursor to iterate through all the role grants as defined in the temporary table:
/*GRANT CHILD ROLES TO PARENT ROLES*/
DECLARE
    DYN_SQL STRING;
BEGIN
    LET rsRoles RESULTSET :=(
        SELECT CHILD_ROLE,PARENT_ROLE FROM ROLE_HIER
        GROUP BY ALL
        );
    LET cRoles CURSOR for rsRoles;
    FOR r IN cRoles DO
        DYN_SQL := CONCAT('GRANT ROLE ',r.CHILD_ROLE, ' TO ROLE ',r.PARENT_ROLE);
        EXECUTE IMMEDIATE(:DYN_SQL);
    END FOR;
END;
Final Role Hierarchy after script execution
Conclusion
By following these steps, you can efficiently create and manage a role hierarchy in Snowflake. This script ensures that all roles are created and properly assigned, which is crucial for maintaining a secure and organized Snowflake environment. Feel free to customize the role hierarchy table (`ROLE_HIER`) to fit the specific needs of your organization.
Managing roles in Snowflake doesn’t have to be complicated. With the right approach and tools, you can set up a scalable and maintainable access control structure that supports your business needs.
The full SQL script is available on my GitHub Repo.
Follow me on LinkedIn and Medium for more content on Data Management and demos including Snowflake, Streamlit, and SQL Server.
Customer information has long been a challenging data set to wrangle, especially with identity resolution and record matching. My team is often engaged to assist our clients in this area of customer data integration (CDI) or entity resolution. Are “Bob Smith” and “Robert Smith” the same person? Possibly.
There are several methods and tools in the market to assist with identifying similar customers and recently Snowflake added the VECTOR data type as well as LLM functions as part of the CORTEX suite to help “vectorize” text. Snowflake also has a function to support Jaro-Winkler similarity to compare two strings.
Common use cases in application and data development include identifying records that are already present in an application or data table. In this demo, I’ll create a simple Streamlit app and use a combination of Cortex Vector and Jaro-Winkler functions to generate a “score” of how similar an input string is to an existing customer name in a customer table. Note: this is not a production-grade solution, it is for demonstration purposes only. The “score” I use is just a method to pick a match. In a production system, this scoring method would likely include other data points and ranking/scoring functions.
Prerequisites
Before starting, there are several initial setup items needed for Snowflake as well as Streamlit. The initial Snowflake steps to enable Cortex are covered in one of my prior demos. For Steamlit, you’ll need a Python Dev Environment with the Streamlit and Snowpark libraries installed.
Customer Data Sample
In keeping with the AI/LLM theme of this post, I used Snowflake Cortex’s COMPLETE function and the Snowflake Arctic model to generate a Snowflake SQL statement to create a simple CUSTOMER_INFO table and populate it with approximately 25 sample records. Using the prompt below, Snowflake generated a command I copied into my SQL Worksheet and loaded the sample table.
/*CREATE A SAMPLE DATA SET*/
SET MODEL_NAME = 'snowflake-arctic';

SELECT SNOWFLAKE.CORTEX.COMPLETE($MODEL_NAME,'GENERATE A SNOWFLAKE SQL STATEMENT TO CREATE OR REPLACE A TRANSIENT TABLE IN ST_DEMO_DB.RAW_DATA SCHEMA CONTAINING AUTOINCREMENTING CUSTOMER ID called CUST_ID, FIRST NAME, LAST NAME AND FULL NAME WITH DEFAULT VALUE OF CONCAT_WS(\' \',FIRST NAME,LAST NAME). NAME TABLE CUSTOMER_INFO INCLUDE INSERT SCRIPT TO POPULATE 25 SAMPLE RECORDS. WRITE THE SQL STATEMENTS ONLY, NO EXPLANATIONS AND FORMATTED TO RUN NATIVELY IN SNOWSIGHT. EXCLUDE ANY FOMATTING CODE');

/*OUTPUT FROM CORTEX*/
-- Create or replace transient table in ST_DEMO_DB.RAW_DATA schema
CREATE OR REPLACE TRANSIENT TABLE ST_DEMO_DB.RAW_DATA.CUSTOMER_INFO (
  CUST_ID INT AUTOINCREMENT,
  FIRST_NAME STRING,
  LAST_NAME STRING,
  FULL_NAME STRING DEFAULT CONCAT_WS(' ', FIRST_NAME, LAST_NAME)
);

-- Insert script to populate 25 sample records
INSERT INTO ST_DEMO_DB.RAW_DATA.CUSTOMER_INFO (FIRST_NAME, LAST_NAME)
VALUES
('John', 'Doe'),
('Jane', 'Doe'),
('Alice', 'Smith'),
('Bob', 'Smith'),
('Charlie', 'Johnson'),
('David', 'Johnson'),
('Evelyn', 'Brown'),
('Frank', 'Brown'),
('Grace', 'Davis'),
('Henry', 'Davis'),
('Isabella', 'Miller'),
('Jack', 'Miller'),
('Kate', 'Wilson'),
('Larry', 'Wilson'),
('Mary', 'Taylor'),
('Nathan', 'Taylor'),
('Olivia', 'Anderson'),
('Peter', 'Anderson'),
('Quinn', 'Thomas'),
('Rachel', 'Thomas'),
('Sophia', 'Jackson'),
('Thomas', 'Jackson'),
('Victoria', 'White'),
('William', 'White'),
('Xavier', 'Harris'),
('Yvonne', 'Harris'),
('Zoe', 'Martin');
Scoring Matches with SQL
For this example, I’ll use three functions to score how closely an input string matches a known string, and then take the average of the three to determine an overall score for the match. This method is by no means perfect or anything I’ve run across in my experience; however, it does show the differences in the scoring methods and even the different scores from each model.
Vectorizing Text
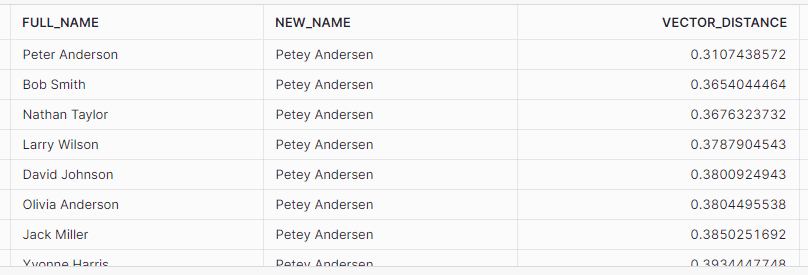
Using the new EMBED_TEXT_768 function of Snowflake Cortex, I can convert my test string as well as the strings in the customer data table into vectors. The function outputs vector value as a VECTOR(FLOAT,768) data type.
Once the strings are converted to vectors, using the function VECTOR_COSINE_SIMILARITY I can generate a score from 0 to 1 that can be used to determine how similar the vectors are. Scores closer to 1.0 indicate “more similar”.
SET VECT_MDL_NM = 'snowflake-arctic-embed-m';
SET NEW_CUST = 'Petey Andersen';

SELECT
VECTOR_COSINE_SIMILARITY(
        SNOWFLAKE.CORTEX.EMBED_TEXT_768($VECT_MDL_NM,CI.FULL_NAME)
        ,SNOWFLAKE.CORTEX.EMBED_TEXT_768($VECT_MDL_NM,$NEW_CUST)
        )
FROM CUSTOMER_INFO AS CI;
Score 2: VECTOR_L2_DISTANCE
Again, after converting my source and target strings to vectors using Cortex, I can create a distance score using VECTOR_L2_DISTANCE. This function also generates a score from 0 to 1 indicating “how far apart” the two vectors are. In this case, scores closer to 0 indicate that the vectors are closer together.
SET VECT_MDL_NM = 'snowflake-arctic-embed-m';
SET NEW_CUST = 'Petey Andersen';

SELECT
VECTOR_L2_DISTANCE(
        SNOWFLAKE.CORTEX.EMBED_TEXT_768($VECT_MDL_NM,CI.FULL_NAME)
        ,SNOWFLAKE.CORTEX.EMBED_TEXT_768($VECT_MDL_NM,$NEW_CUST)
        )
FROM CUSTOMER_INFO AS CI;
Score 3: JAROWINKLER_SIMILARITY
Using the JAROWINKLER_SIMILARITY function on the native strings, I can generate a score from 0 to 100 as to how similar the strings are without vectorizing them first. For this score, closer to 100 indicates the strings are more similar.
SET NEW_CUST = 'Petey Andersen';

SELECT
JAROWINKLER_SIMILARITY(CI.FULL_NAME,$NEW_CUST)
FROM CUSTOMER_INFO AS CI;
Combo Score:
To generate a single score, I’ll average the VECTOR_COSINE_SIMILARITY score, the JAROWINKLER score (converted to a percentage), and 1 minus the VECTOR_L2_DISTANCE score. Again, this is not anything I’ve used in production, it just gives a single score by equally weighting the scores used for comparison.
Final Snowflake Query
Putting all the scores together into a single query and adding in the variables that will be part of Streamlit, I can change the inputs to validate the data output to be sure the app is returning the same data. I’ll also go ahead and add the proper column aliases for the app as well.
SET VECT_MDL_NM = 'snowflake-arctic-embed-m';
SET NEW_CUST = 'Petey Andersen';
SET TTL_SCORE = .50;
SET MAX_MATCH = 5;
SELECT
    $NEW_CUST AS "NEW CUSTOMER NAME",
    CI.FULL_NAME AS "EXISTING CUSTOMER NAME",
    VECTOR_COSINE_SIMILARITY(
        SNOWFLAKE.CORTEX.EMBED_TEXT_768($VECT_MDL_NM,CI.FULL_NAME)
        ,SNOWFLAKE.CORTEX.EMBED_TEXT_768($VECT_MDL_NM,$NEW_CUST)
        ) as "VECTOR SIMILARITY SCORE"
    ,VECTOR_L2_DISTANCE(
        SNOWFLAKE.CORTEX.EMBED_TEXT_768($VECT_MDL_NM,CI.FULL_NAME)
        ,SNOWFLAKE.CORTEX.EMBED_TEXT_768($VECT_MDL_NM,$NEW_CUST)
        ) AS "VECTOR DISTANCE SCORE"
    ,JAROWINKLER_SIMILARITY(CI.FULL_NAME,$NEW_CUST)/100.0 AS "JAROWINKLER SIMILARITY SCORE"
    ,("VECTOR SIMILARITY SCORE" + (1-"VECTOR DISTANCE SCORE") + "JAROWINKLER SIMILARITY SCORE") / 3 AS "CALCULATED SUMMARY SCORE"
FROM
    CUSTOMER_INFO as CI
WHERE
    "CALCULATED SUMMARY SCORE" >= $TTL_SCORE
QUALIFY
    RANK() OVER(ORDER BY "CALCULATED SUMMARY SCORE" DESC) <= $MAX_MATCH;
Streamlit App
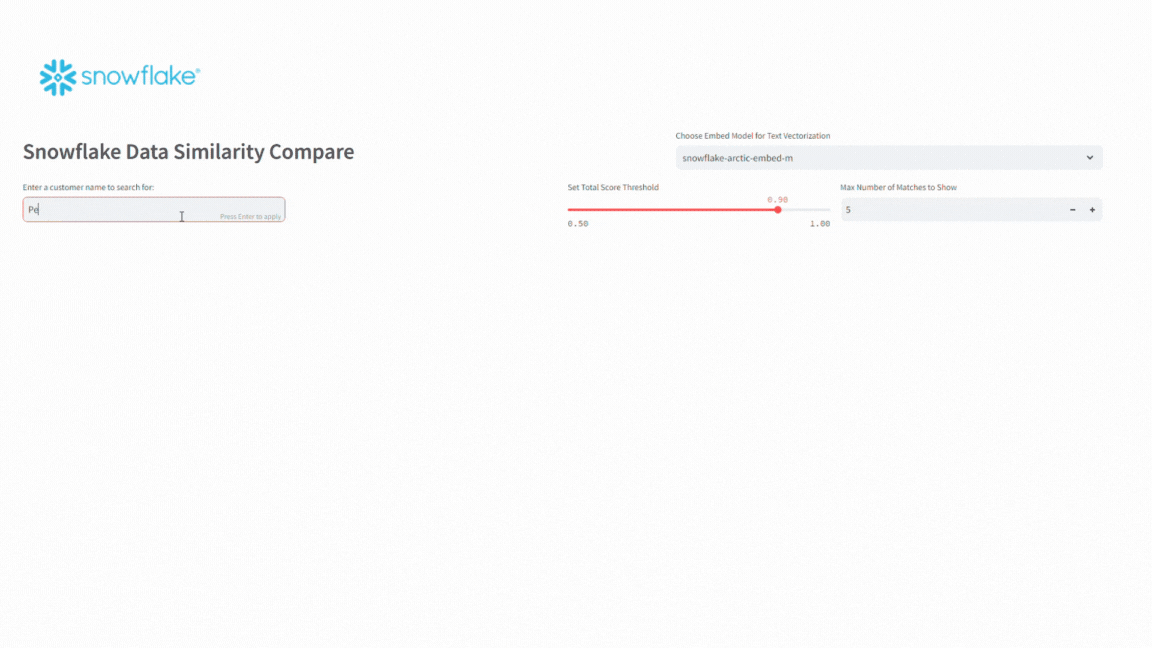
For this app, I’ll add a select box to choose the model for vectorizing the data. Snowflake currently supports two different models – snowflake-arctic-embed-m and e5-base-v2. I’ll also add an input text box for the name to search for, a slider to adjust the acceptable score threshold, and a number chooser for setting the number of matches to display.
#CREATE LLM OPTIONS
llm_models = ["snowflake-arctic-embed-m",
              "e5-base-v2"]

#ADD SNOWFLAKE LOGO, HEADER AND LLM CHOOSER
st.image(image="https://www.snowflake.com/wp-content/themes/snowflake/assets/img/brand-guidelines/logo-sno-blue-example.svg")
colHeader = st.columns([3,2])
with colHeader[0]:
    st.header("Snowflake Data Similarity Compare")
with colHeader[1]:
    curr_model = st.selectbox(label=f"Choose Embed Model for Text Vectorization",options=llm_models)

#BUILD UI
session = sp.Session.builder.configs(creds).create()
colInput = st.columns(4)
with colInput[0]:
    new_cust = st.text_input("Enter a customer name to search for:")
with colInput[2]:
    ttl_score = st.slider("Set Total Score Threshold",min_value=.50, max_value=1.0,value=.90)
with colInput[3]:
    num_results = st.number_input("Max Number of Matches to Show",min_value=1,max_value=10,value=5)
To keep things relatively simple, I’ll Python’s string formatting functions to replace any variable data in the SQL command for Snowflake.
if new_cust:
    new_cust = "\'" + new_cust + "\'"
    curr_model = "\'" + curr_model + "\'"
    sql = f'''
SELECT
    {new_cust} AS "NEW CUSTOMER NAME"
    ,CI.FULL_NAME AS "EXISTING CUSTOMER NAME"
    ,VECTOR_COSINE_SIMILARITY(
        SNOWFLAKE.CORTEX.EMBED_TEXT_768({curr_model},CI.FULL_NAME)
        ,SNOWFLAKE.CORTEX.EMBED_TEXT_768({curr_model},{new_cust})
        ) as "VECTOR SIMILARITY SCORE"
    ,VECTOR_L2_DISTANCE(
        SNOWFLAKE.CORTEX.EMBED_TEXT_768({curr_model},CI.FULL_NAME)
        ,SNOWFLAKE.CORTEX.EMBED_TEXT_768({curr_model},{new_cust})
        ) AS "VECTOR DISTANCE SCORE"
    ,JAROWINKLER_SIMILARITY(CI.FULL_NAME,{new_cust})/100.0 AS "JAROWINKLER SIMILARITY SCORE"
    ,("VECTOR SIMILARITY SCORE" + (1-"VECTOR DISTANCE SCORE") + "JAROWINKLER SIMILARITY SCORE") / 3 AS "CALCULATED SUMMARY SCORE"
FROM
    ST_DEMO_DB.RAW_DATA.CUSTOMER_INFO as CI
WHERE
    "CALCULATED SUMMARY SCORE" >= {ttl_score}
QUALIFY
    RANK() OVER(ORDER BY "CALCULATED SUMMARY SCORE" DESC) <= {num_results}
'''

    df = session.sql(sql)
    st.dataframe(df,use_container_width=True)
Running the app and changing the inputs, I can search my existing customer table and then set score thresholds to see how the results change.
Conclusion
In this demo, I used Snowflake Cortex to generate an SQL command to load a table with demo data and vectorize text for comparisons. From there I created a simple scoring query and used Streamlit as an application interface for searching for existing customers.
The vector functions show promise in identifying similar text; however, the scoring thresholds will certainly need a lot of monitoring and tuning to ensure proper matching; especially if accuracy is key in cases such as customer identification.
The full set of SQL scripts and the Streamlit app code are available on my GitHub Repo.
Follow me on LinkedIn and Medium for more content on Data Management and demos including Snowflake, Streamlit, and SQL Server.
It seems everywhere you look AI is booming. With so many different LLM options to choose from which one is “right” for your application? If you’ve worked with any LLM or AI model, you know that depending on how you prompt it, you can get vastly different responses. I wanted to compare how different models responded to the same prompt without going to multiple sites needing multiple API keys or building multiple apps – and by combining the new Snowflake Cortex and Streamlit, I can do just that.
In this demo, I’ll build a Streamlit app that will show side-by-side responses from one or more LLM models available in Snowflake Cortex, including the new Snowflake Arctic model! For this demo, I’ll set up a new Snowflake demo account in the AWS West region. As of the time of writing this article, Arctic is only available to accounts in this region, so it allows using all the models in Cortex. If you already have a Snowflake account, check here to see if Cortex is supported in your cloud provider and region.
Snowflake Setup
Before jumping into the Streamlit app, I’ll need to do some initial setup in my Snowflake account. At a minimum the Cortex permissions will need to be granted by the AccountAdmin role; however, I also like to go ahead and set up Streamlit-specific objects including Database, Schemas, Role, and Warehouse. The full setup script is available in my GitHub Repo.
Streamlit Setup
With my Snowflake account prepped, I can start working on my Streamlit app. For this article, I’ll assume you already have a Python Dev Environment and Streamlit installed. If not go here.
I wanted the app to have a “chatbot” feel and Streamlit’s recent updates support this out of the box. Also, by leveraging st.session_state we can show the chat history. This app will also show the responses side-by-side of one or more models, so it’ll have some dynamic elements. The number of model options to include is up to you, but I chose to set my max to five.
Library Initialization
Before adding any Streamlit elements, we’ll need to include the appropriate Python libraries for Streamlit, Snowpark, and Cortex.
#IMPORT STREAMLIT LIBRARY
import streamlit as st
#IMPORT SNOWPARK
import snowflake.snowpark as sp
#IMPORT COMPLETE FUNCTION FROM SNOWFLAKE CORTEX
from snowflake.cortex import Complete
st.set_page_config(page_title="Snowflake LLM Comparisons",layout="wide")
Header Setup
Before adding the header, let’s add the Snowflake session configuration and a list to hold the model names. Once those are set, let’s add a header bar that has the Snowflake logo, a header block, and a number chooser to set the number of models to run. Following the header, we’ll use a while loop to clear or set up appropriate st.session_state variables to store the chat history for each model.
#READ CREDS INTO DICTIONARY
creds = {
"account":"YOUR ACCOUNT",
"user":"YOUR USERNAME",
"password":"YOUR PASSWORD",
"database":"YOUR DB",
"schema":"YOUR SCHEMA",
"role":"YOUR ROLE",
"warehouse":"YOUR WAREHOUSE"
}
#CREATE LLM OPTIONS
llm_models = ["snowflake-arctic",
"reka-flash",
"llama2-70b-chat",
"mistral-large",
"mixtral-8x7b",
"mistral-7b",
"gemma-7b"]
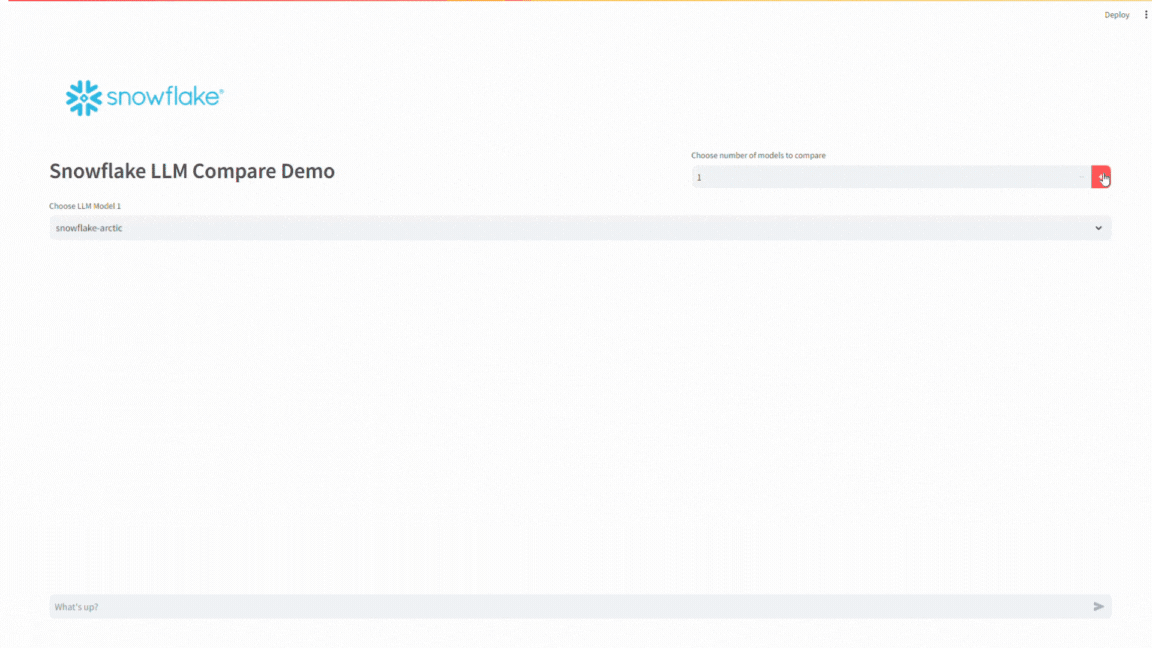
#ADD SNOWFLAKE LOGO, HEADER AND LLM CHOOSER
st.image(image="https://www.snowflake.com/wp-content/themes/snowflake/assets/img/brand-guidelines/logo-sno-blue-example.svg")
colHeader = st.columns([3,2])
with colHeader[0]:
st.header("Snowflake LLM Compare Demo")
with colHeader[1]:
mx_llms = 5
cntLlm = st.number_input(label="Choose number of models to compare",min_value=1,max_value=mx_llms)
#INITIALIZE THE SESSION STATE
if "cntLLM" not in st.session_state:
st.session_state.cntLLM = 0
if cntLlm != st.session_state.cntLLM:
#CLEAR ANY EXISTING STATES
x=0
while x < mx_llms:
chatHist = f"chatHist_{x}"
if chatHist in st.session_state:
del st.session_state[chatHist]
if x < cntLlm and chatHist not in st.session_state:
st.session_state[chatHist] = []
x+=1
st.session_state.cntLLM = cntLlm
Building the Chat Bot
Now that the header is ready and can set the number of models to compare, we can add the chat elements to the app. First, the app will need an input box. Streamlit makes this simple with the st.chat_input element. Additionally, since this will be a dynamic app, we’ll use a while loop to add select boxes and chat message boxes for the number of models chosen.
Using the complete function from Cortex, we’ll pass the user’s input to the specified model, capture the response, and then write it to the appropriate chat box. As part of the process, we’ll also write the user’s input and the model’s response to the appropriate session_state variable to keep the chat history.
#BUILD UI
#ENTER PROMPT FIRST
llm = list(range(0,cntLlm))
colChat = st.columns(cntLlm)
prompt = st.chat_input("What's up?")
if prompt:
    session = sp.Session.builder.configs(creds).create()
x=0
while x < cntLlm:
    with colChat[x]:
        chatHist = f"chatHist_{x}"
        llm[x] = st.selectbox(label=f"Choose LLM Model {x+1} ",options=llm_models,key=f"llm_{x}",index=x)
        for m in st.session_state[chatHist]:
            with st.chat_message(m["role"]):
                st.markdown(m["content"])
        if prompt:
            st.chat_message("user").markdown(prompt)
            st.session_state[chatHist].append({"role":"user","content":prompt})
            with st.chat_message("assistant"):
                resp = Complete(llm[x],prompt,session)
                st.markdown(resp)
                st.session_state[chatHist].append({"role":"assistant","content":resp})
    x+=1
App in Action
Running the app builds a simple tool that allows you to choose one or more models to test a prompt with. Enter your prompt in the input box and then press enter – it’ll send the prompt to the model(s) you selected and return the response to the screen. Depending on the prompt, this may take a few seconds per model.
Wrapping Up
Snowflake Cortex brings AI to your fingertips and pairing with Streamlit makes it easy to activate AI for a user. In this post, we setup our Snowflake account and built a simple chatbot app to send the same prompt to multiple models so the user can compare the output between models.
The full app code is also available in my GitHub Repo.
Follow me on LinkedIn and Medium for more content on Data Management and demos including Snowflake, Streamlit, and SQL Server.