During a recent build of a Snowflake data environment, I encountered a challenge while translating my SQL Server code to Snowflake. As any seasoned database developer knows, dealing with staging tables and SCD (Type-2 slowly changing dimension) tables is par for the course in data warehousing.
In the realm of table creation, there’s the classic brute force copy/paste method, but let’s face it – it’s not foolproof. Over the years, I’ve found myself occasionally missing columns during development, and default values tend to slip through the cracks.
Entering the world of SCD tables, where default values can play a crucial role in maintaining data integrity. Adding columns to an existing table with default values is a breeze in SQL Server; however, the same can’t be said for Snowflake at the time of writing this piece. That’s when I stumbled upon the magic of CREATE TABLE LIKE in Snowflake SQL.
Now, you might be wondering, why bother with CREATE TABLE LIKE when a simple copy/paste could do the trick? Well, here’s the twist. In my Snowflake setup, I leverage TRANSIENT tables for staging – they get truncated and loaded frequently. The beauty of TRANSIENT tables lies in their ability to save storage space in my Snowflake account, thanks to their exclusion from FAIL-SAFE storage and limited time travel features. However, attempting to use CLONE to create a transient raw table for my permanent SCD tables throws an error.
Sure, my approach might seem a tad elaborate, but I found it intriguing – using a table of one type as a template for another. Here’s the drill: I kick things off by creating my permanent SCD table, including all the necessary columns for the stage and SCD tables, complete with default values. Once the SCD table is created, I use CREATE TABLE LIKE to create the transient stage table.
With both tables in existence, it’s time to trim the fat – drop any unnecessary columns from the stage and SCD tables. Now is also the opportune moment to fine-tune data retention time settings.
CREATE OR REPLACE TABLE DATA_SCD
DATA_RETENTION_TIME_IN_DAYS = 7
(
    CUSTOMER_ID NUMBER(12,0)
    ,CUSTOMER_NAME VARCHAR(100)
    ,CUSTOMER_EMAIL VARCHAR(100)
    ,START_DATE DATE DEFAULT CURRENT_DATE() /*SCD ONLY*/
    ,END_DATE DATE DEFAULT ('12/31/9999'::DATE) /*SCD ONLY */
    ,INSERTED_DATE TIMESTAMP_NTZ DEFAULT CURRENT_TIMESTAMP() /*STG ONLY*/
    ,REC_ID NUMBER(38,0)
);

CREATE OR REPLACE TRANSIENT TABLE DATA_STG LIKE DATA_SCD;
ALTER TABLE DATA_STG SET DATA_RETENTION_TIME_IN_DAYS=0;
ALTER TABLE DATA_STG DROP COLUMN START_DATE;
ALTER TABLE DATA_STG DROP COLUMN END_DATE;

ALTER TABLE DATA_SCD DROP COLUMN INSERTED_DATE;
As a database developer navigating the dynamic landscape of SQL Server and Snowflake, this unconventional yet effective method adds a touch of creativity to the routine tasks of table creation and maintenance.
For a recent proof of concept, I needed to transfer data from five or six relatively small tables from SQL Server to Snowflake. Normally, I would go through all the steps to set up an ingestion pipeline in Snowflake; however, for a POC, that all seemed like overkill. I simply needed to copy the data from those tables from SQL Server to Snowflake. Python and Snowpark to the rescue!
Pre-Requisites
This article assumes the reader has a working knowledge of Python, Snowflake, and SQL Server. Additional pre-requisites for the code samples shown include:
Python Development Environment
I use VSCode, but any Python IDE or environment will work
Python Libraries
snowflake-connector-python
snowflake-snowpark-python
sqlalchemy
pandas
Snowflake Account
SQL Server access
Import Python Libraries
Like most Python scripts, the first step is to import all the needed libraries.
#IMPORT LIBARRIES
import pandas
from sqlalchemy import create_engine
from snowflake.snowpark import Session as sp
from snowflake.connector.pandas_tools import write_pandas
Build SQL Server Connection
Using SQL Alchemy build a connection to SQL Server. In my instance, I am using Windows Authentication, so no username/password is specified. Modify the connection string as needed to fit your SQL Server instance.
#SET SQL SERVER OPTIONS
sql_server_options ={
    "server":"SQLSERVERNAME",
    "database":"DBNAME",
    "table_name":"TABLENAME"
}
#BUILD SQL CONNECTION STRING
sql_server_conn_str = (
        f'mssql+pyodbc:///?odbc_connect='
        f'driver=ODBC Driver 17 for SQL Server;'
        f'server={sql_server_options["server"]};'
        f'database={sql_server_options["database"]};'
        f'trusted_connection=yes;'
    )
# Create an SQLAlchemy engine and connect to SQL Server
sql_server_engine = create_engine(sql_server_conn_str)
Load SQL Server Data into Pandas
Use the read_sql_table function to read the SQL Server table into a Pandas dataframe. This process can be very resource-intensive. I would recommend using this method only for “smaller” tables. In my example, I am using a date dimension table that is 32 columns wide by 15,000 rows. deep. This method may not be a good candidate for larger (i.e. wide and deep) tables.
Additionally, to assist with the table build in Snowflake, I’ll convert all the column names to upper case and set all the datatypes to string. The string datatype will be sufficient for a “quick and dirty” load to Snowflake. Once the data is loaded, I can copy it into another table and assign proper datatypes. This exercise is simply to get the data moved from SQL Server to Snowflake quickly.
#READ DATA
sql_df = pandas.read_sql_table(sql_server_options["table_name"],sql_server_engine)
#CONVERT TO STRING AND RENAME COLUMNS TO UPPER
sql_df = sql_df.astype("string")
sql_df.rename(columns=str.upper,inplace=True)
Build Snowflake Connection
Use Snowpark for Python and establish a connection to Snowflake ensuring to specify the proper database, schema, role, and warehouse to create the target table.
#SET SNOWFLAKE CREDS
snowflake_creds = {
            "account":"ACCOUNTLOCATOR",
            "user":"USERNAME",
            "password":"PASSWORD",
            "database":"DATABASE",
            "schema":"SCHEMA",
            "role":"ROLE",
            "warehouse":"WAREHOUSE"
        }
#CONNECT AND WRITE DATA TO SNOWFLAKE
sf_session = sp.builder.configs(snowflake_creds).create()
Create the Table and Write Data to Snowflake
Using the write_pandas command along with the auto_create_table setting, write the SQL Server data contained in the Pandas dataframe to Snowflake. By setting auto_create_table to true, write_pandas will create a table of the same structure as the dataframe.
#CREATE TABLE AND WRITE DATA, DROP TABLE FIRST IF ALREADY EXISTS
sf_session.write_pandas(sql_df,str.upper(sql_server_options["table_name"]),auto_create_table=True,overwrite=True,table_type='transient')
Conclusion
Python and Snowpark can make tasks quite simple for “quick and dirty” purposes, but shows just how powerful it can be for more large scale work. It took just under 50 lines of code to quickly and easily move data from SQL Server to Snowflake. I don’t recommend this method for large datasets, or for production-grade work; however, to quickly move something for POCs or “tinkering”, it’s hard to beat a small reusable script like this.
In a recent article, I showed a local Streamlit app that enforces role-based row access policies based on the Snowflake role used in the session variable. The selectbox in the app simulated how the app would act as users in different roles executed the app. Are native Streamlit apps capable of using RBAC for Row Access? The short answer is yes; however, the solution I found is quite complex.
This article assumes that either the hard-coded or table-driven row access policy is in place from earlier articles. The code samples shown will not work if one of those row access policy methods is not in place.
App Role in Native Streamlit
Since native Streamlit apps are objects in Snowflake, they behave like all other objects in Snowflake from an ownership and privileges standpoint. As such, when running the app, any queries against Snowflake will be executed by the app owner role, regardless of the current user’s role. Being a newer Streamlit developer, I was initially confused and frustrated with this distinction. The only supported session connection method as of the time of this article is get_current_session. When using this connection method, session.get_current_role returns the user’s current role, not the app owner role used to execute queries against Snowflake.
Session Role vs App Role
Adding a few lines of code to the demo app to display the current session role and current app roles will help illustrate the role differences at execution time.
#GET CURRENT SESSION ROLE
sess_curr_role = session.get_current_role().strip('"')
#QUERY SNOWFLAKE AND WRITE TO DATAFRAME
app_context_sql = f"""
SELECT
CURRENT_ROLE() AS APP_QUERY_ROLE,
'{sess_curr_role}' as APP_SESSION_ROLE
"""
df_app_context = session.sql(app_context_sql).collect()
#PRINT TO SCREEN
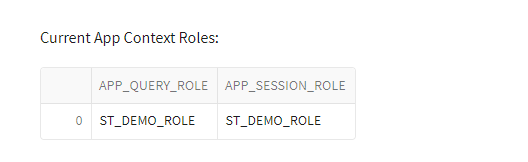
st.write("Current App Context Roles:")
st.dataframe(data=df_app_context)
App Context Roles – Executing App as ST_DEMO_ROLE
Changing Session Role
There appear to be plans for support in native Streamlit apps to support changing a session role through the use_role function like non-native Streamlit apps. Attempts to use this function return an error in the app. Additionally, adding a USE ROLE command in any SQL commands in the app also returns an error.
use_role method showing in Native Streamlit Python Editor
Using Session Role in Native Steamlit App
Through several failed iterations, I found an approach that works with native Steamlit apps using the user’s session role to enforce row access policies. Admittedly, this solution is not ideal for all applications. It adds data and object management complexity, even in small data warehouse systems.
One of the Snowflake features implemented in this solution is specifying the role used when calling procedures. Snowflake allows procedures to be executed as the OWNER or as the CALLER of the procedure. This feature will allow the native Streamlit app to call a procedure as the app role, but the procedure will execute as the procedure’s owner role which will then be used to enforce the row access policy.
Role Hierarchy Realignment
Before making any app changes, a few roles need to be realignment roles in Snowflake to move the app owner (ST_DEMO_ROLE) to the top of the hierarchy and break the relationship between ST_APP_USERS and ST_DEMO_ROLE. Finally, adding ST_APP_USERS as a child to SNOW_SALES allows all roles in the hierarchy access to the Streamlit app.
Current Role Hierarchy
/*ADD SALES ORG ROLE HIERARCHY TO ST_DEMO_ROLE FOR STREAMLIT*/
USE ROLE SECURITYADMIN;
GRANT ROLE SALES_MGR TO ROLE ST_DEMO_ROLE;
/*GRANT SNOW_SALES ACCESS TO APP*/
GRANT ROLE ST_APP_USERS TO ROLE SNOW_SALES;
/*CLEAN UP HIERACHICAL ROLES*/
REVOKE ROLE ST_APP_USERS FROM ROLE ST_DEMO_ROLE;
REVOKE ROLE SALES_MGR FROM ROLE SYSADMIN;
Hierarchy After Realignment
Create Role-Specific Schema and Procedure
The sample row access policy limits data in the VW_SALES_DATA view based upon the REGION_NAME. The remainder of the app data is filtered based on the selected REGION_NAME. By limiting the REGION_NAME values in the selectbox in the app by role, the rest of the app will naturally filter itself.
ST_DEMO_ROLE_SCH Schema Creation
First, create a new schema using the app owner role name as part of the schema name. Doing so violates most object naming best practices; however, this solution leverages the session role to modify app behavior.
/*BEGIN STREAMLIT DB MODS*/
USE ROLE ST_DEMO_ROLE;
USE WAREHOUSE ST_DEMO_XS_WH;
USE DATABASE STREAMLIT_DB;
/*CREATE NEW SCHEMA FOR ST_DEMO_ROLE*/
CREATE OR REPLACE SCHEMA ST_DEMO_ROLE_SCH;
USP_GET_REGION Procedure
Next, create a stored procedure that replaces the SQL code in the app to return the REGION_NAME values. The procedure must be executed as OWNER rather than CALLER. Using execute as owner is the crux for this solution to running Snowflake queries as non-app owner roles in a native Streamlit.
/*CREATE NEW PROCEUDRE*/
USE SCHEMA ST_DEMO_ROLE_SCH;
CREATE OR REPLACE PROCEDURE USP_GET_REGION()
RETURNS TABLE(REGION_NAME VARCHAR)
LANGUAGE SQL
EXECUTE AS OWNER
AS
$$
DECLARE
    df_region RESULTSET;
BEGIN
    /*GET THE LIST OF REGIONS*/
    df_region := (
    SELECT
        REGION_NAME
    FROM
        STREAMLIT_DATA.VW_SALES_DATA
    GROUP BY
        REGION_NAME
    ORDER BY
        REGION_NAME);
    /*RETURN THE REGION LIST*/
    RETURN TABLE(df_region);
END;
$$;
Add Procedure to Streamlit App
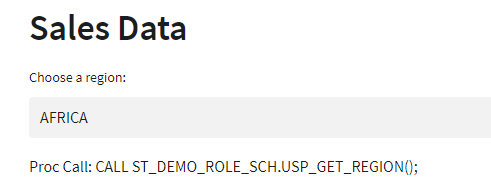
Finally, add the procedure to the Streamlit app to replace the SQL command and include steps to dynamically set the schema name in the procedure call and write the command to the screen. Adding the additional screen output may not have real app value in a practical application, but demonstrates this solution’s execution.
#COL1 = REGION
with col1:
    region_sql =f"""
    CALL {sess_curr_role}_SCH.USP_GET_REGION();
    """
    region_df = session.sql(region_sql).collect()
    region_name = st.selectbox("Choose a region:",options=region_df)
    st.write(f"Proc Call: {region_sql}")
–
Streamlit app using procedure to populate selectbox
Creating Role-Specific Schemas
The next step in this method requires the creation of a schema and procedure for each role that will execute the app. In this demo, I have three non-admin roles: SALES_MGR, AM_EU_SALES, and NON_AM_EU_SALES.
Creation By Brute Force
The most brute force method for creating the requisite schema and procedure objects would be to change to the appropriate role in Snowflake and run the appropriate CREATE script(s) to create the schema and procedure. Even for small implementations, this could be time-consuming.
Creation By Clone
Using Snowflake’s CLONE feature will save some time; however, there is a caveat to doing so. When using CLONE on a schema, all the objects in that schema are cloned as well, but the child objects retain the privileges of the original object. Also note that the role cloning the schema needs at least USAGE privileges on the schema being cloned. Please reference the Snowflake Documentation on cloning for details and other use cases.
To use CLONE for this step process, there will be an additional step to transfer the ownership of the child objects back to the schema owner. In small implementations, this process is not overly time-consuming. In larger implementations with many objects, it would be more tedious – Snowflake Scripting or Python would be options to ease that burden through code.
/*GRANT PERMISSIONS ON DB AND SCHEMA FOR SNOW_SALES*/
USE ROLE ST_DEMO_ROLE;
GRANT CREATE SCHEMA ON DATABASE STREAMLIT_DB TO ROLE SNOW_SALES;
GRANT USAGE ON SCHEMA ST_DEMO_ROLE_SCH TO ROLE SNOW_SALES;

/*CREATE SALES_MGR SCHEMA*/
USE ROLE SALES_MGR;
CREATE OR REPLACE SCHEMA SALES_MGR_SCH CLONE ST_DEMO_ROLE_SCH;

/*CREATE AM_EU_SALES_SCHEMA*/
USE ROLE AM_EU_SALES;
CREATE OR REPLACE SCHEMA AM_EU_SALES_SCH CLONE ST_DEMO_ROLE_SCH;

/*CREATE NON_AM_EU_SCHEMA*/
USE ROLE NON_AM_EU_SALES;
CREATE OR REPLACE SCHEMA NON_AM_EU_SALES_SCH CLONE ST_DEMO_ROLE_SCH;

/*UPDATE OWNERSHIP*/
USE ROLE ST_DEMO_ROLE;
GRANT OWNERSHIP ON PROCEDURE SALES_MGR_SCH.USP_GET_REGION() TO ROLE SALES_MGR;
GRANT OWNERSHIP ON PROCEDURE AM_EU_SALES_SCH.USP_GET_REGION() TO ROLE AM_EU_SALES;
GRANT OWNERSHIP ON PROCEDURE NON_AM_EU_SALES_SCH.USP_GET_REGION() TO ROLE NON_AM_EU_SALES;
With the addition of four new schemas to the STREAMLIT_DB, the landscape is cluttered for users in roles with elevated privileges.
Role-Specific Schemas and Objects: ST_DEMO_ROLE
Row Access In Streamlit App
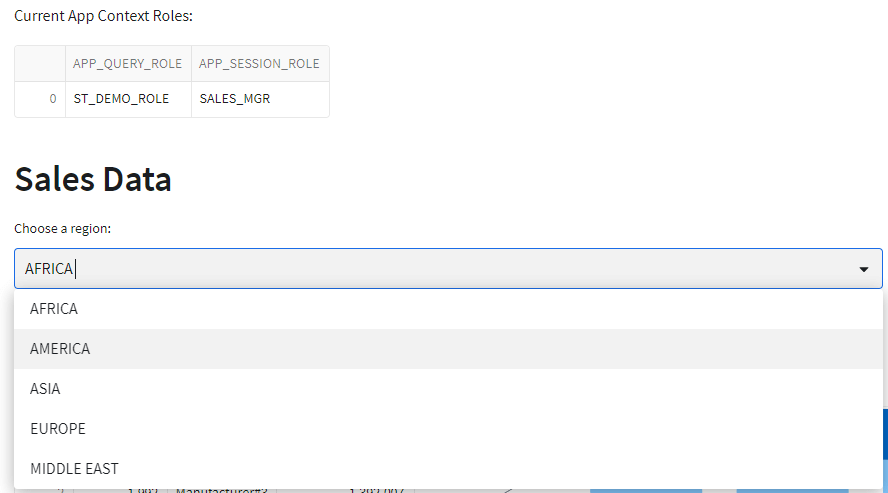
With the schemas in place and the app updated to use the new procedure, the final step is to run the app as different user roles and verify that the row access policy is enforced as expected. The role context code added at the start of this demo will help illustrate the app using the same app role in all scenarios, but a different session role.
App running as SALES_MGR
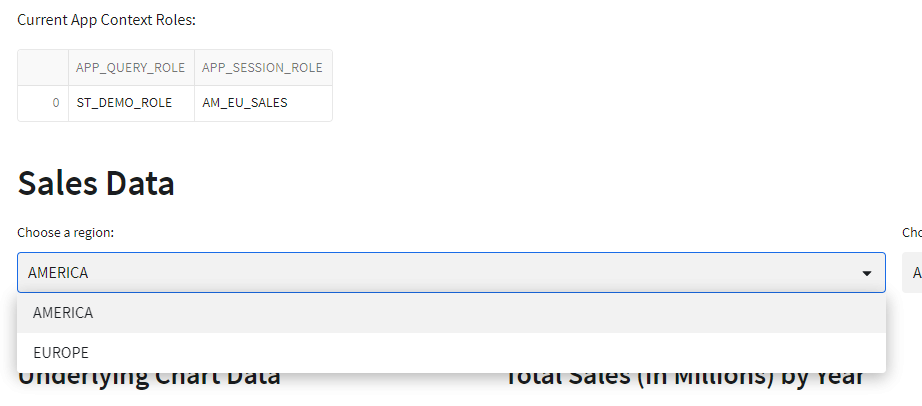
Running App as AM_EU_SALES
Running App as NON_AM_EU_SALES
Conclusion
The solution in this article presented some of the challenges associated with enforcing role-based row access policies in a native Streamlit app in Snowflake. Currently, this is quite a complex implementation; however, there seems to be potential for improvements in future releases.
This solution required realignment of role hierarchies, creation of role-specific schemas and procedures, and updates to the app to leverage the new objects.
Despite the complexity involved, this approach adds a layer of flexibility to native Streamlit apps requiring role-based access control in Snowflake.
Code Repository
The code shown in this article, along with other demo code for Snowflake and Streamlit is available on my GitHub Repository: Snowflake_Demos