In the first article in this series, I covered how to add a simple “Hello, World!” sample Streamlit application to Snowflake. The power of this newer feature comes into play when using data from Snowflake in the Streamlit. With the app running natively on Snowflake the data never leaves the Snowflake ecosystem; therefore, saving on data transfer costs.
Connecting to Snowflake
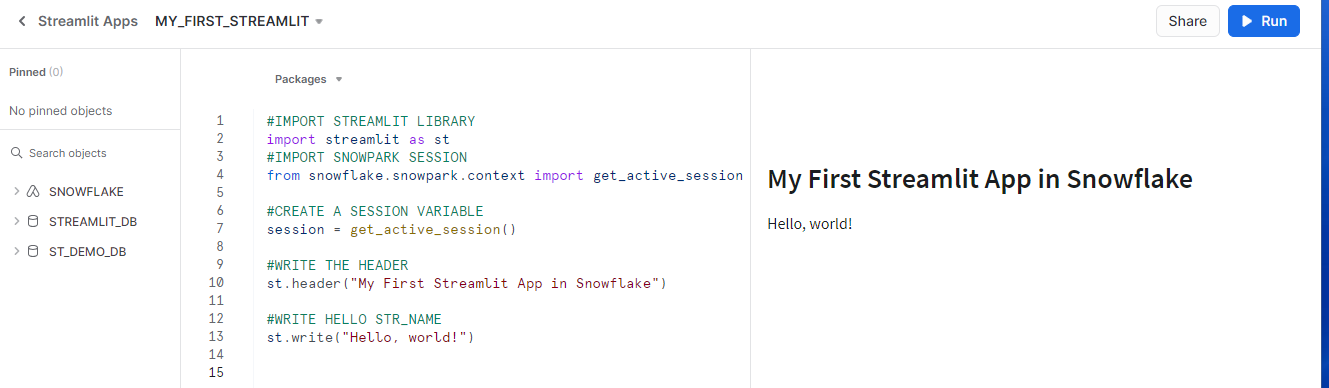
Connecting a native Streamlit app to Snowflake can be done in two lines of code – one to import the proper Snowpark library and one to call the get_active_session function.
I’ll also use a shortcut for my code editing this time by editing the code directly in Snowflake rather than in my IDE or text editor. Once logged into Snowsight, I’ll switch to the app owner role, ST_DEMO_ROLE. Now when I run the MY_FIRST_STREAMLIT app, I have an option in the upper right corner of Snowsight to EDIT the app. By clicking that button, a text editor opens on the left side of the screen allowing me to edit my_first_streamlit.py within Snowsight.

With the editor open, I’ll update the code as shown to connect to Snowflake and create a session variable.
#IMPORT STREAMLIT LIBRARY
import streamlit as st
#IMPORT SNOWPARK SESSION
from snowflake.snowpark.context import get_active_session

#CREATE A SESSION VARIABLE
session = get_active_session()

#WRITE THE HEADER
st.header("My First Streamlit App in Snowflake")

#WRITE HELLO STR_NAME
st.write("Hello, world!")
Clicking RUN in the upper right corner will save the code and apply the changes. If done correctly, the application shouldn’t look any different on the right side of the screen; however, we have now established a connection with our current Snowflake session.
Displaying Session Information
Now that I’ve connected to my current session, I’ll add a few lines of code to write some session information such as current warehouse and current database to the screen using st.write() as done before with “Hello, world!”.
#IMPORT STREAMLIT LIBRARY
import streamlit as st
#IMPORT SNOWPARK SESSION
from snowflake.snowpark.context import get_active_session

#CREATE A SESSION VARIABLE
session = get_active_session()

#WRITE THE HEADER
st.header("My First Streamlit App in Snowflake")

#COLLECT SESSION INFORMATION
current_db = session.get_current_database()
current_schema = session.get_current_schema()
current_warehouse = session.get_current_database()
current_role = session.get_current_role()

#WRITE TO SCREEN
st.write(f"Current Database: {current_db}")
st.write(f"Current Schema: {current_schema}")
st.write(f"Current Warehouse: {current_warehouse}")
st.write(f"Current Role: {current_role}")

Executing SQL Against Snowflake
Running SQL against Snowflake directly is one of the great benefits of native Streamlit! Streamlit has built-in features to easily display query results in a grid in the app. With the small changes below, I’ll show the same session information as before, but display it in a grid.
The first step is to build the SQL command and store it to a variable. Notice here I’m using the triple-quote Python formatting to make the SQL query a bit easier to read. Why did I not include the CURRENT_USER function? Just as the get_current_user Streamlit function is not support yet, CURRENT_USER would return only a NULL value.
#BUILD SQL COMMAND
sql = """
SELECT
    CURRENT_DATABASE() as current_database
    ,CURRENT_SCHEMA() as current_schema
    ,CURRENT_WAREHOUSE() as current_warehouse
    ,CURRENT_ROLE() as current_role;
"""
Next, I’ll execute the SQL in the session, collect it into a data frame variable, and write it to the screen using the Streamlit Dataframe Object. Executing SQL against Snowflake using the session variable created previously done by using the .sql() function of the session object. Notice the .collect() added to the end of the .sql() function. Adding collect() executes the command and stores the data output into the target variable.
#QUERY SNOWFLAKE
df = session.sql(sql).collect()

#WRITE TO SCREEN
st.dataframe(data=df)
Clicking RUN again will update the app and show the session information in the data grid.
#IMPORT STREAMLIT LIBRARY
import streamlit as st
#IMPORT SNOWPARK SESSION
from snowflake.snowpark.context import get_active_session

#CREATE A SESSION VARIABLE
session = get_active_session()

#WRITE THE HEADER
st.header("My First Streamlit App in Snowflake")

#BUILD SQL COMMAND
sql = """
SELECT
    CURRENT_DATABASE() as current_database
    ,CURRENT_SCHEMA() as current_schema
    ,CURRENT_WAREHOUSE() as current_warehouse
    ,CURRENT_ROLE() as current_role;
"""

#QUERY SNOWFLAKE
df = session.sql(sql).collect()

#WRITE TO SCREEN
st.dataframe(data=df)

Wrapping Up
Connecting a native Streamlit to Snowflake is quite simple, requiring only a few lines of code. In this example, I connected to my active Snowflake session and showed two methods for retrieving and displaying the session information.
In the next installment, I’ll show how to populate a drop-down box from Snowflake and then use the selected option to query my TBL_EVT_LOG table.

2 thoughts on “Snowflake: Connecting Native Streamlit Apps”